Hayward Super Pump Repair Guide
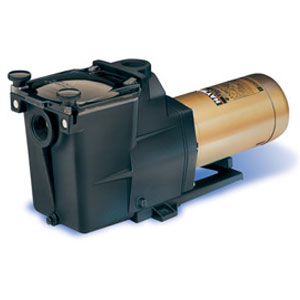
Hayward is very well known in the swimming pool industry for the great quality swimming pool products they make. One of their most popular lines of swimming pool pumps is called the Hayward Super Pump. This pump is offered in both the Super Pump Standard and The Super Pump II. The Super pump is installed in millions of backyards all over the world and is well known for its long lasting life.
Even though the Hayward Super Pump is one of the top pumps in the industry, the daily use of this pump will eventually require troubleshooting and Hayward Super Pump repair. These repair are not that hard to do yourself if you are the hands on kind of repair person. If you are not comfortable working on with basic hand tools you could always bring the pump down to a local repair shop and have them diagnose and fix your pump. Things like the mechanical pump seal, pump bearings, pump gaskets and so on will have top be replaced along the way. Most of these things can be repaired in a few hours with replacement Hayward parts that are generally sold at your local swimming pool supply store.
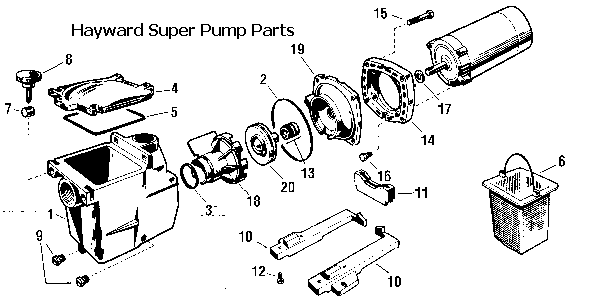
Below you will find the most common things that will have to be repaired on the Hayward Super Pump swimming pool pump. Most of the repairs on this pump can be preformed with a 9/16″ inch socket or wrench, a Flathead screwdriver and a pair of channel lock pliers.
How To Change The Super Pump Seal
The Hayward Super pump uses a two part mechanical seal to protect the motor from the wet end of the pump. This seal can be replaced in a few small steps and will only take an hour or two if you have a set of wrenches and some other basic hand tools.
The first thing you will want to do is to disconnect the pump and drain it free of any water that may be in the volute. You can do this by removing the two drain plugs on the pump. One will be in the front of the pump and one will be on the side. Once the pump is drained out you will want to remove the four 9/6 bolts that connect the Hayward Pump housing to the motor bracket. Once you do this pump housing will separate from the motor end of the pump and you will now see the impeller. Grab hold of the impeller and turn it counter clockwise until it spins off of the pump motor shaft. You may have to hold the other end of the pump shaft with a pair of pliers. You can do this by removing the back motor cover. Now that the impeller is off of the motor shaft you will able to see both parts of the pump seal. Slide the pump seal spring off of the impeller and place it to the side. You will be replacing this with the new one in a few minutes. The second part of the Hayward mechanical pump seal is located in the pump seal housing. You will now need to take your finger and pull the ceramic seat from the seal housing. This ceramic seal seat will be wrapped with a black rubber washer, make sure you also remove that from the pump seal housing.
Now that you have both parts of the seal removed from the pump you can replace both parts of the seal with the replacement Hayward Super Pump seal. When re-inserting the ceramic seat you may want to put a small amount of silicon on the rubber casing to ensure that you will not have a leak. You can now screw the impeller back onto the pump shaft and re-attach the volute to the motor of the pump. Make sure you prime the Hayward Super Pump before you run it by filling the wet end of the pump with water before turning it on.
How To Prime The Hayward Super Pump:
The Hayward super pump is considered a self-priming swimming pool pump but this does not mean that the pump will actually prime itself if dry. When any type of swimming pool pump is dry you will have to fill the volute of the pump with water. This will allow the pump impeller to create a suction draw and start to pull the water from the swimming pool plumbing.
To prime the Hayward Super Pump you will just need a bucket of water or a garden hose. The first thing you will want to do is to remove the Super Pump Cover or also know as the pump basket cover. This lid will be made from clear plastic and will have two black handles knobs on each side. To remove the pump cover you will have to loosen each knob counter clockwise until the fold to the side. Once the knobs are loose you can remove the pump cover.
Now that the cover is off of the super pump volute also know as the wet end of the pump, you can take your bucket of water and pour it into the pump until the pump basket area is completely full of water. Now that the pump is full of water you can put the cover back onto the volute of the Hayward Super Pump. You swimming pool pump is now considered to be primed and you can now go ahead and turn on the pump. It may take a few minutes for the pump to fully be up to prime once it’s running.
How To Install The Hayward Super Pump
There are two fitting connections on the Hayward Super Pump housing. These inlets can be either 1.5″ inches or 2″ inches depending on the horsepower and size of your super pump. You will need to connect both side of the pump to your swimming pool system. On the front of the Hayward Super Pump is the suction side inlet. You will want to connect this side of the pump to the suction side of your swimming pool plumbing. The suction side of the swimming pool system is the side that has the main drain and skimmers hooked up to it. Some pools will not have a main drain, but every pool will have a skimmer or two. The suction side of the Hayward Super Pump will connect to the skimmer and the main drain.
On the top of the Hayward Super Pump is where you will find the discharge fitting connection. The discharge side of the super pump will get connected to the discharge side of your swimming pool system. The discharge side of the swimming pool system powers the swimming pool returns, pool vacuums and sometimes the pool slide or water fall if they are installed on the pool. Usually the discharge side of the Hayward Super Pump will get directly plumbed into the pump side of the multi-port directional valve and then the multi-port will connect to the discharge side of the pool plumbing. Once the both the suction side and the discharge side of the Hayward Pump are connected you can prime the pump and start it up making sure it reaches a full prime.
How To Drain The Hayward Super Pump
Draining the Super pump can be fast and easy to do. You will want to grab a 9/16″ box wrench or adjustable wrench and remove the two drain plugs that are on the bottom of the Hayward pump housing. You will find one drain plug on the from of the pump housing and one on the side. Once the water stops draining from the drain plugs holes your pump will now be drained.
How To Change The Hayward Pump Cover Gasket:
The pump cover gasket is easy and fast to change. This gasket often has to be replaced every few years because of all the opening and closing of the pump cover. The replacement of this gasket is part of the normal maintenance of the super pump. To install a new Hayward pump cover gasket you will need to remove the pump cover from the pump housing of the pump. You can do this by turning the two black hold down knobs counter clockwise until you can fold them to the side, so you can lift and remove the cover.
Once you have the cover off of the pump housing you can take a Flathead screwdriver and pry out the old pump cover gasket. Sometimes they melt or can be stuck, so you may have to do a bit of scraping if your gasket is really old. Most of the time the pump cover gasket will just pull right out. Once you have fully removed the old pump cover gasket you will want to insert the new gasket by firmly pressing the gasket into the groove on the pump housing. Once the gasket is set in place you can re-install the pump lid and re-start your pump, your cover gasket is now changed.
How To Change The Super Pump Motor Bearings:
If your super pump is “screaming” or making lots of noise chances are you will need to replace the motor shaft bearings that are inside of the motor. To do so you will have to remove the motor end from the pump housing. Once you have the motor removed from the pump housing you can remove the impeller and the pump seal housing. Now that the pump seal housing, the impeller and everything has been removed from the motor end you can start to take apart the motor.
You will need to remove the pump motor through bolts and then remove the front and the rear cover from the motor casing. Once the through bolts and the covers are removed you slide the motor armature shaft out from the casing. Once you removed the motor armature you will have to remove the old motor bearings and then press on new ones. Once your new bearings are pressed on to the motor armature shaft you can start to re-assemble the super pump in the reverse order that you took it apart. Take your time and put it back together the correct way. Do not forget to replace the water sling on the motor as well.
Super Pump Troubleshooting and Common Problems:
Problem: “My Hayward Super Pump Will Not Prime”
Solution: You will always want to make sure you have no air leaks in the suction side of the pump or the swimming pool plumbing. This can cause the pump not to prime. Make sure the unions and the pump cover are tight. Also make sure to fill the pump housing with water before starting the motor.
Problem: “I have air inside my pump cover and bubbles in my swimming pool.”
Solution: When you have air coming out of your swimming pool returns this means that your pump is sucking air from somewhere. Check your suction fitting and drain plugs to make sure they are tight and not leaking. You also will want to make sure you pump housing cover lid is good as well.
If You Have Any More Questions Or Problems Please Ask:

I have a SP2607 that runs for a few minutes makes a noise like its binding and then starts to click like its trying to start if I let this go on it will trip the breaker. It all started after i replaced a leaking seal, the seal is installed correctly and everything seems normal (it spins fine) its only about 3.5 years old. Any suggestions?
I’m having the same problem, did you find a solution?
I have a Hayward s180t–1580 filter.Had to take the control apart not sure if i have the valve control functions backwash rinse ect in the right place???
Thank you Have a great day
My Hayward pump has started a screaming/loud grinding noise but still pumps w/o problems. Can I continue to run the pump until I can get it repaired or will this cause further damage if run?
Hi Stephen,
Like anything the longer is goes without repair the worse it will get. The reason your super pump is making all the noise while running is probably because your motor bearings inside the pump are bad. This will make the motor use more amps and also sometimes over heat the motor windings. You can still run it, but try to get it repaired as soon as possible. Although I have seen many pumps “scream” for seasons, and then some just go after a few days. It all depends on the pumps age etc.
Hope this helps and if you have any more questions please ask,
Joseph
Quick question. I’m getting lots of air in the return and I doubt it’s from the suction side lines. I say that because there is absolutely no air visible in the pump. I’ve checked the plugs and the cover gasket. Other details: There is NO loss of water. Also, I just swapped out the sand in the filter and made sure the fingers are attached and unbroken.
I’m beginning to think it is the mechanical pump seal.
Am I off? Would a bad seal produce lots of bubbles but not show up in the pump? If not, what else might explain air in the jets without visible air in the pump and no water loss?
Thanks
Hi Matt,
Yes, the mechanical seal can draw air, BUT usually when the seal is bad it will leak when the pump is not running,
Have you checked the front suction fitting which is usually a male adpt that is screwed into the front of the pump?
I would check the suction fitting and also the o-ring in the suction union as well.
But yes, it could be the seal.
Let me know if you need more help,
Joseph
I have a Hayward Superpump which was humming but no creating a suction. I reached in side and the impeller will not move. I have remove the motor from the filter housing however i can not get the impeller loosened from the body. I am rotating counterclockwise but no movement….any suggestions?
Hi Roger,
You will have to turn it real hard or use a “strap wrench” to help remove the impeller,
Let me know if you need more help,
Joseph
Thanks Joseph, i ended up breaking the top of the impeller off it was so tight. Good thing though i plugged in the motor and the shaft is spinning as required, no bearing problem. Looks like i lust need a new impeller….or is there more?
rog
Hi Roger,
Yes, just buy a new impeller and a new mechanical seal, You will also want to replace the pump seal anytime you remove the impeller,
Let me know if you have any more questions, I am here to help!!
Joseph
Hi, I have a super pump that is 15 years old. It stays outside during the winter, and runs 24/7 during the pool season in Ohio. Recently I noticed water on the concrete under the pump housing, and decided to replace all the rubber gaskets, pump seal, and slinger. This has stopped the leakage and only cost $25 in parts. I inspected the impeller and diffuser while it was out and it all looks good. The motor, although 15 years old, runs fine and sounds good. My concern is how long “permanently lubricated” motor bearings are supposed to last? I would not be able to change the bearings, the through-bolts are completely rusted on the back end. Should I go ahead and order a replacement motor to have on stand-by?
Hi Andrew,
I used to work in a pump shop for many years rebuilding these pumps and thats good news for you,
Let me teach you a trick.
Get yourself an angle grinder and grind off the “nuts” on the back side of the motor through bolts,
Then you can pull the back end motor cap off and side the armature out and then slide the front motor cover off WHICH will have the through bolts still in them,
Now you can take that front motor bell housing and put it into a vise and take a pair of vice grips and turn the though bolts out and replace them with new ones.
To answer your question about “how long to seal bearings last?” Well it all depends on how you take care of it, BUT your at 15 years so I would say your getting close.
Let me know if you have any more questions.
Joseph
My Super pump is getting hot after about 15 minutes and is pulling about half the water it normally does/
How can I take the motor apart off the pump housing?
Thanks
I’m looking for the specifications (capacitance and voltage) for the motor start capacitor on a 3/4 horse EC1309 super pump. Thanks.
Hi Mike,
Are you just looking for spec or are you looking for the replacement part?
Joseph
Hi Joseph:
I saw your response to Roger regarding removing the impeller. No problem from that point, since the motor shaft will not turn! So turning the impeller counter clockwise against that resistance was no issue. When I tested the motor without the impeller in place, I only heard a humming noise, but no shaft rotation. Do you suspect a seized shaft and bearing failure. At one point I did see a slight rotation, but I was concerned for the thermal overload tripping, so I turned it off immediately. There are no flat spots on the shaft to get any mechanical grip. Would that make any difference? I could join two nuts on the thread, if applying torque might free the shaft. New motor, or bearings?
Also, does the Diffuser gasket fit inside the strainer housing, or simply ‘butt’ up against the inside of the housing? The gasket is very difficult to re-install, once out.
Great site. Thank you.
Hi Robin,
Thanks for the kind words on the website, We try our best, make sure to tell friends / co -workers ;-)
Lets get to your problems.
1) The pump is frozen or humming:
I have mentioned this a few times on posts here and many people have had luck. What I suggest is to smack the pump with a hammer a few times to break free any rust that has gather on the motor armature and sometimes inside the bearings, I actually just made a video today to help people visualize this better:
Here is that video:
http://video.wetheadmedia.com/my-pool-pump-motor-is-humming
Now “sometimes” the bearings will be so frozen that this will not work, but its worth giving it “a whirl” VS shelling out $$$ for a new motor right away. I have been successful doing this many times for many customers over the years.
2) Replacement of the Diffuser Gasket. The diffuser gasket needs to be actually placed on the diffuser itself. I also made a video to show you and everyone else that comes by this as well.
Here is the diffuser gasket replacement video:
http://video.wetheadmedia.com/hayward-super-pump-diffuser-gasket-replacement
Please let me know if you have any other questions or need any other help.
Joseph
I had a similar problem at the start of the season. Took the pump to my local dealer, who found a pool tile preventing the motor from turning. Saved me a new motor. Now, as my pool is older, and I have only been here 5 yrs, the wires were old, so in replacing them, my motors are working, but now my ploaris on the aux pump, is barely getting good flow to it to keep it moving. Does it matter if I have one pump hooked up to the electric one way and the aux motor to possibly the other electrical posts? Also, I am getting alot of de into the pool, collecting everywhere. I have had this before, but not as bad as this season. Could it be I put too much? I know this is a two part q, but never having had a pool before, and not having any of the booklets on my system does not help. Thanks for any advice you can offer. Ed in NJ
Hi Ed,
I have responded to your questions here:
http://wetheadmedia.com/no-flow-to-the-polaris-booster-pump/
I will speak to you on that thread, its way easier,
Joseph
Hey Joseph:
Thanks for confirming what I am seeing. Earlier, in reading the FAQ on the Hayward site, they indicate that the humming might also be caused by a capacitor being open or the governor being stuck in the open position. How does one check for that, and where? Could your ‘hammer technique’ have the effect of ‘closing’ the offending parts as mentioned above? I recognize the value of jarring any rust or particles between the armature and the windings, but this motor was running fine (a little noisy) up until mid morning yesterday.
Thanks,
Rob.
ALSO see this thread / articles comments after you read below:
http://wetheadmedia.com/polaris-booster-pump-troubleshooting-repair-guide/ <—- Lots of "motor" talk there as well.
Motor Shuts OFF – Check For:
1. Undersized wiring; loose connections; etc.
2. Low voltage at motor or power drop (frequently caused by undersized wiring or extension cord use).
3. Mechanical binding and electrical overload.
NOTE: Your Hayward pump motor is equipped with an “automatic thermal overload protector.†The motor will
automatically shut off if power supply drops before heat damage can build up causing windings to burn out. The
“thermal overload protector†will allow the motor to automatically restart once the motor has cooled, provided the
power source is again up to proper levels. It will continue to cut On/Off until the problem is corrected. Be sure to
correct cause of overheating.
Motor Hums, But Does NOT Start – Check For:
1. Centrifugal switch stuck in OPEN position.
2. Binding of motor shaft.
Here is how you can check the Capacitor:
Source:
http://forum.allaboutcircuits.com/showthread.php?t=5326
You can use your multimeter as an ohmmeter to test the capacitor.
1) Discharge the capacitor by shortening its leads. That is – use a wire and connect the leads of the capacitor together. This will discharge it.
2) put your multimeter in the high ranges 10K-1M
3)CONNECT MULTIMETER TO CAPACITOR LEADS(OBSERVE THE POLARITY IF ELECTROLYTIC). AT SOON AS THE LEADS MAKE CONTACT, THE METER WILL SWING NEAR ZERO. IT WILL THEN MOVE SLOWLY TOWARD INFINITY. FINALLY THE METER WOULD COME TO BE INFINITE OHMS BECAUSE THE CAPACITOR IS BEING CHARGED BY THE BATTERY OF THE MULTIMETER.
4) IF THE CAPACITOR IS BAD, IT WILL GO TO ZERO OHMS AND REMAIN THERE. THIS IS CALLED A SHORTENED CAPACITOR
5) IN THE CASE OF AN OPEN CAPACITOR THERE WILL BE NO OHMMETER INDICATION.
6)SOME CAPACITORS HAVE A LOW DIELECTRIC LEAKAGE. YOU WILL KNOW THIS IF THE OHMMETER COMES TO REST AT A POINT LOWER THAN INFINITE. TEST A KNOWN GOOD CAPACITOR OF THE SAME TYPE TO BE SURE
Hope This helps you and let me know if you need more help,
Joseph
Great advice.. I did the hammer trick and heard “almost” a turn over … I’m about to disassemble to see if I can move the mechanisms inside. I have 2 questions..
1) I see no mention of WD40 as a lubricant.. Bad idea to spray inside the back vents or once the motor is open to help free any rust?
2) My motor is only about 5 years old.. hayward super pump.. it’s always blown out but never removed and brought inside.. i wasn’t told or it wasn’t recommended for me to do that. But the only difference is that all last season i heard this hum for up to 2 to 7 seconds, then it would crank up. It was essentially everytime I fired it up… Kind of sounds more like it’s getting not enough power or too much at first. Is that possible? Would that hum for 2 to 7 seconds for the last couple years be an indicator? ( I’m curious because then obviously kicking and smacking it would do no good!!! )
Hi Jason:
You Wrote:
No, That’s not a good idea. The only thing that requires grease / lubricant is the ball bearings on the motor armature shaft BUT they are usually “sealed” bearings so no need to spray anything.
1) You could have a bunch of surface rust on the armature, switch etc.
Here is some tips for humming besides the hammer:
Motor Hums, But Does NOT Start – Check For:
1. Centrifugal switch stuck in OPEN position.
2. Binding of motor shaft.(rust as described above)
What you can do is also remove the “wet end” of the pump and then spin the impeller a few times.
You can also open the back of the pump and turn the shaft from there as well.
Take a look at this photo I took:
http://photos.wetheadmedia.com/hayward-super-pump-switch-assembly
ISSUE #2
You Wrote:
Yes, in fact you’re not going crazy, that’s the good news! This can be a symptom of the pump being wired for 220 volts and being powered by 110 volts.
This can happen two ways:
1) The person who installed the pump / motor left it factory wired for 220v and then the source is 110v.
2) The pump is running on 220v BUT one of the “hot legs” from the panel is dead and the pump is only being feed 110v.
That would be what I would look for if I was in a customers backyard.
Let me know if you need any more help or have any other questions,
Sorry for the super long response.
Joseph
I did take the wet end of the pump apart and found MASSIVE amounts of sand in it.. i took what was pretty much 2 black pieces of the wet end apart and I’m left with just a smooth shaft with a threaded end… and that dissapears into a fairly healthy looking piece of metal. I had knocked and brushed all the sand up ( which filled about 90% of the space between sealed end and the black piece that backed the impeller up.
I took a pair of plyers with some cloth wrapped around and tried to move as all the posts suggested above with no luck but NO force.
I also already smacked it fairly good as per your video.
I’m in the process of loosening up the 2 rusted bolts on the back end to take that apart. I can see that photo – THANKS! – and saw many posts about the switch being stuck ( the centrifugal switch ) but don’t know what the switch is as this is my first time inside a motor. I guess any switch I’ll flip it to see what happens.
As for that electrical problem.. The only reason I’m unsure of that is the first couple years I don’t recall that hum then start up. I think my main issue is that the sand build up around the pump.
My real question here is though after I take the parts of the wet end apart.. and i’m left with that shaft dissapearing into the metal.. do I take the 4 hex bolts I see off and keep going? Or is everything sealed beyond that point and it’s garbage or job for a repair shop. Budget is of the biggest concern.
And THANK you for the long response. I apologize for not clearing up some of the posts I noticed about the hammering, centrifugal switch etc… I greatly ( esp my 3 little ones) appreciate the help in getting this going!
Hi Jason,
Once you take the wet end off you will be at the point of the motor and then will need to start taking the motor apart,
See this article here:
http://wetheadmedia.com/polaris-booster-pump-motor-overhaul-rebuild-guide/
It explains how to rebuild a Polaris motor BUT its basically the same thing (through bolts, motor bearings, end bells etc)
If after reading that article you feel you are still “handy” enough and have access to a vise and some hand tools you could change the bearings yourself.
In fact in that same article in the comments you will see a response from a fellow that even timed himself ( I am not kidding) and he did it in 1.7 hours and bough the bearings for only $18 at grainger….
So let me know what you think or ask me more questions.
Joseph
oh and by the way.. just 3 weeks ago when i first fired it up it ran for a couple weeks already.
Joseph. Thanks A MILLION! Combination of consistent hammer/tapping, general clean up, pushing the cent switch open/close, turning the drive from the electrical end got it churning!!!
Hey Jason,
WHOOO HOO! That’s what I like to hear! I am glad you got it going!
Please feel free to come back and anytime and let me know if you need more help!
Joseph