Polaris Booster Pump & Motor Overhaul / Rebuild Guide
Getting Started: Shut Down The Polaris Booster Pump:
Before you can rebuild or repair your Polaris Booster pump you will want to make sure that it is not going to turn on or run while you’re working on it. The best thing to do is to manually shut the timer off and then disconnect the electrical cord from the outlet. This will ensure that your pump does not turn on while your working on it. If you do not have a timer you can just skip that step and make sure that the motor is unplugged from the power source.
How To Disconnect The Polaris Pump From The Filter System:
There are two different ways that your Polaris Booster pump can hook up to your swimming pool filter system. Some Polaris Booster pumps will hook up with flexible hoses and quick disconnect fittings and other Polaris booster pumps will be plumbed in using SCH40 or SCH80 PVC pipe.
How To Disconnect The Booster Pump With Flexible Hoses:
If you have a Polaris pump that is connected with flexible hoses and quick connects then disconnecting your pump will require no tools. What you will want to do is to “push down” on the quick disconnect collar and then slide the hose off the fitting. This can require a bit of strength as sometimes the hoses and the quick connect rings. The Polaris hose will sometimes be stuck as well and you will need to pull really hard to get the hose off of the quick connect fitting.
How To Disconnect Polaris Pumps Plumbed With Rigid PVC:
If you have a Polaris pump that is plumbed in with rigid PVC pipe then you will need a pair of channel lock pliers. You will want to look for the union fitting that should be plumbed into both the Polaris feed and return line. You will need to turn the union collar counter clockwise to loosen. Once the union collar is loose you will want to spin the collar all the way off the threads and then the two parts of union (face and seat) will disconnect. You will need to do this on the feed and the return side of the Polaris pump. The front of the Polaris pump is the feed and then top of the pump is the return side.
How To Drain The Polaris Booster Pump Free Of Water:
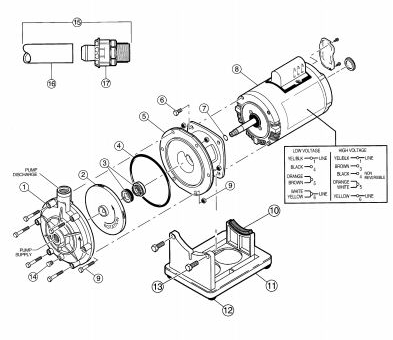
The Polaris booster pump is equipped with a drain plug that is located on the bottom of the volute. You can remove this drain plug by using an adjustable wrench and then turning it counter clockwise until it is removed from the pump. Once you remove this drain plug the water inside of the Polaris pump will drain out. Sometimes it’s also good to turn the pump upside down so that any addition water can drain through the discharge side of the pump. The drain plug is part #14 in the diagram below.
How To Remove The Polaris Pump Wet End / Pump Assembly:
Once you have drained the pump you will now want to remove the pump assembly, which is also called the of the pump. You will first want to remove the outer volute cover that you can see in the diagram below. If you look in the diagram below you will want to remove part numbers #1 and #9. These are the bolts that hold the volute cover on to the pump housing.
Next you will want to remove the impeller and then the impeller housing, these are part numbers #2 and #5 in the diagram. Once you have removed the pump assembly / wet end of the pump you will be ready to start re-building or repairing the booster pump motor.
How To Rebuild The Polaris Booster Pump Motor:
Removing The Motor End Bells:
In order to change the motor bearing in the Polaris motor, you will need to open up the motor and remove the motor armature. What you will need to do first is to remove the motor end bells. These are the front and rear covers of the motor. To do so you are going to have to remove the four through bolts that hold the front and back motor covers.
Using a nut driver you can remove all four of the though bolts. You will have to turn the through bolts counter clockwise to loosen them. In some cases the heads of the through bolts maybe rotted away and this could prevent you from opening the motor. In such cases where the though bolts are rotted away to a point where you cannot remove them, it might be best to just change replace the entire motor. If the though bolts are rotted that badly chances are that the rest of the motor will be as well (rotted) and it won’t be worth fixing. But chances are your bolts are still fine, so you will want to use that nut driver to remove the four motors through bolts.
How To Remove The Polaris Motor Armature:
Once you have removed the motor through bolts your next step will be to extract the electric motor armature that is inside of the Polaris booster pump. You will want to grab a flat head screwdriver and knock the motor ends bells (font and back covers) gently off of the motor housing. As you use the screwdriver and the hammer to tap off the end bells you will see that they will start to separate and then the end bells will come loose. Once this happens you will be able to slide out the motor armature. The Polaris motor armature is where the bearings that you will be changing are located. Once you have both the front and the rear end bells removed from the motor you will now want to remove the armature from the inside of the motor casing / windings. Once you do so you will be able to see the front and the rear pump bearings that you will be replacing.
How To Remove The Polaris Pump Motor Bearings:
Now that you have the motor armature out you are going to want to remove the bearings and then off course replace them. In order to remove the bearings your going to need a tool called a motor bearing puller. This bearing puller will easily remove the bearing from the shaft of the motor armature without damaging anything.
You can buy a motor bearing puller for around $14.00 and up depending on the name brand of the tool. Most auto part stores will lendout tools for free and this could be a great way to not have to buy the bearing puller if you’re not into having your own tools. If you have a vice on a workbench then you should put the motor armature into the vice, as that will make it easier for you to use the bearing puller as we describe below.
Once you have your motor ball bearing puller you will want to put the tip of the puller in the center of the motor shaft and then take the two claw arms and attach them to each side of t he bearing. Once you do so you will want to start tightening down the threaded shaft on the bearing puller. Once you start turning the bearing pullers threaded shaft clockwise you will start to see the bearing remove from the motor armature. Keep turning the bearing puller shaft clockwise until the bearing is all the way off of the shaft.
You will want to remove the front and the rear bearing. It is always best to replace both of the motor bearing when rebuilding the motor. If you choose to only change one, chances are the other bearing will soon fail and you will have to re-open the motor and do the above steps all over again. Its just best to replace both of t he motor bearings while you have the pump apart.
How To Install New Polaris Motor Bearings:
To install the new motor bearing on the shaft of the motor armature you will need a bearing press tool. This tool is designed to fit over the shaft of the motor armature but also meant to press against the inner race of the ball bearing. What you will want to do is to gently place the bearing into position onto the motor shaft. Once the bearings are on the shaft you will want to slide the bearing press tool onto the shaft and let it lay against the bearing.
Now you will want to take a hammer and knock the bearing onto the shaft with the bearing press tool. If you have access to an actual arbor press then you can also that to push the bearing onto the shaft as well, but most people don’t have access to an arbor press so the bearing press tool comes in handy. If you cannot locate a bearing press tool you can look for a socket that fits over the pump shaft but also matches up with the inner race of the motor bearing. Never press the bearing onto the shaft using the out race of the bearing or you could damage or destroy the motor bearing.
Re-Assembling The Polaris Motor:
By this point you should have both of your Polaris motor bearings changed and you will be ready to start putting the motor back together. You will want to re-assemble the motor in the opposite way you took it apart. You will first want to slide the motor armature back into the motor housing / windings. Next you will want to put the front and back end bells / motor covers onto the motor casing. You then will want to re-insert the through bolts and tighten them up evenly.
After you tighten all the motor through bolts you will want to make sure that the motor shaft still spins freely. In rare cases, over tightening these bolts can result in a frozen or jammed motor shaft / armature. Once the through bolts are tighten, you will want to make sure to know replace or use the old water sling and install that back onto the pump shaft. The water sling is the rubber washer that sits on the motor shaft on the front of the motor to sling water away from the motor in case the mechanical pump seal leaks. Now that you completely have the motor back together you can get ready to put the wet end / pump assembly back onto the motor frame / housing.
Make Sure You Install A New Mechanical Pump Seal:
After rebuilding your Polaris pump motor you will need to install the wet end of the pump but we wanted to tell you to make sure that you change the mechanical pump seal. You never will want to use a seal that has been pre-used if you can help it. In some cases you can get away with using the old seal but in most cases the seal will leak after a short time and then you will just wind up taking the pump back apart to change the seal.
Re-Assembling The Polaris Booster Pump Wet End:
The last step in overhauling your Polaris pump motor and pump is to reattach the wet end of the pump. You first will want to reattach the pump seal housing. After you attach the seal housing you will want to now screw the impeller back on to the motor shaft. Once you have the impeller on the motor shaft you can now put the pump housing cover / front side of volute back onto the front of the pump.

I am trying to check my booster pump it appears that I should have more pressure then it has I connected a water hose directly to the inlet and when I turn the water on it begins to flow out the outlet line but when I turn the pump on I do not seem to get a big difference in the water flow should the water flow when the pump is turned on shoot the water up with power I removed the front off and there is nothing blocking inpeler my question is how much pressure and how high should the water shot up when the pump is engaged
I have a new motor that seems stronger than the one that was replaced but the Polaris is tying itself in knots and not doing the job. There is a very strong discharge into the pool that is highly visible coming from the connector that goes into the wall. Will adding a pressure reducer solve the problem?
Need to have my polaris pump repaired. Can I cap both ends of pipe and continue using pool filter