How To Fix Seven Types Of Leaky Faucets
Millions of faucets each years start to drip, run, or simply just start to leak. Most of the times these faucets never get repaired and then wind up getting replaced. The problem is that this is just very wasteful and can be avoided but most people do not know how easy it can be to repair a leaky faucet of any kind. We will show you how to fix a leaky faucet, but not only for one type of faucet but seven different kinds of faucets that may be around your home or business.
All of these faucets can be repaired using ordinary hand tools. The parts you may need to repair your faucet can be bought at any local hardware store, an online plumbing supply merchant or even a local plumbing supply house. The fact is that 90% of leaky faucets can be repaired in under two minutes for under $5.00. That’s a lot better then spending hundreds of dollars on a completely new bathroom or kitchen faucet.
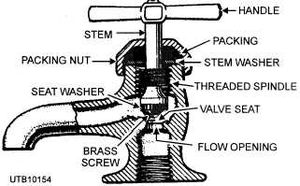
So let’s talk about what usually leaks on faucets and why they leak. There are actually several kinds of leaks you can have on a faucet. There are three parts of any faucet that will leak the most. The first part is the faucet stem washer. This washer can breakdown over time and just a small pinhole or part of it that wears away can make that faucet drip. The second most common part that will leak on a faucet will be the faucet stem seat. The faucet seat generally will go bad if the washer has been leaking for sometime and has been ignored. Faucet seats do not usually wear out on there own.

However when you replace a faucet washer it is always a good idea to change the seat if you have one available. The third and last most common part that will leak on the faucet will be the “packing”. The packing is a type of rope is used in certain types of faucets like outdoor hose bibs , single handle kitchen faucets and more. This packing is held in by a “packing nut” which is designed to tighten down so that the leaky faucet can be tightened to stop the leak.
So now that we have described what type of leaks you can have and how they are generally repaired we will go into more detail on each particular faucet and show you how to fix the drip. Please remember that not every faucet will be able to be repaired due to some common reasons. Sometimes products like “washer less faucets” or plastic faucets ca simply just break forever, but 95% of faucets can be repaired with a few minutes of your time. Let’s get started shall we.
How To Fix A Dripping Faucet:
Before we can even get started explaining how to fix a dripping or leaking faucet we will first tell you that you will need a few hand tools. You will need a pair of pliers, flat head screw driver and a Philips head screw driver. If you also have a pair of channel locks that will be good as well. If you are looking to replace a stem, seat or a washer you will need a stem removal tool on some faucets and you will need the seat removal tool to pull the seat from the faucet.
How To Fix A Kitchen Faucet:
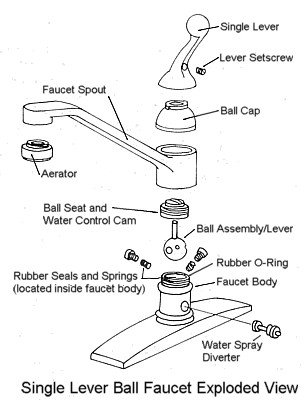
The most common problems that will cause drips or leaks on kitchen faucets are bad washers and loose packing rings. If you have a single handle kitchen faucet that is leaking you will want to tighten the packing nut that is on the faucet. You will need to take an Allen key or screwdriver and loosen the set screw that is holding the faucet handle on. Once you remove the handle you can tighten the packing ring a half turn. Once you have tightened the packing nut put the handle back on and open the faucet. If you still have seepage or a drip remove the handle again and give the pacing nut another half turn. Repeat this process until your leak stops. You do not have to tighten the handle set screw all the way back down until you have finished adjusting the faucet packing nut.
If you have a two handle kitchen faucet that has a drip and you think it may be the seat or washer then use or “how to change a faucet washer and seat” guide below.
How To Fix A Leaking Bathroom Faucet:
The first thing you will need to determine before you go and try to fix the leaky bathroom faucet is to make sure its not a washer less faucet. If it is a cheap plastic washer less faucet with out removable stems you might as well just buy a new faucet but make sure the new faucet is rebuild-able. You could always hire a licensed Plumber as well if you can not determine the type of faucet you have.
However if you do have a bathroom faucet that does have washers, seats and stems you can use our guide below to learn how to change the faucet seat and washer.
How To Fix A Bathtub Faucet:
The bathtub faucet is a bit different then a kitchen sink or bathroom sink faucet. Your bathtub could be a stand alone shower body with a wide spread hot and code valve system or a combination shower body that controls the shower head and the tub spout. Depending one what type you have will depend on what type of repair you will need to do. Lets start the process of elimination to determine what type of shower valve you have.
Here are some questions that will help you determine what type of shower valve you have.
Do You have a wide spread faucet or a single handle faucet?
If you have single handle faucet you will need to change the “shower body cartridge”. Look for the make of the valve and buy the replacement shower body cartridge for your shower. Moen and Delta shower bodies are very common in new homes. So if you have bought your home within the last 5 years your probably have a Moen or A Delta Faucet that is defective or even just worn from age. The cartridge can be bought at most home centers as well as plumbing supply houses.
If you have a three handle faucet or a wide spread faucet then you can replace the faucet washers , faucet seats and stems in your valve.
How To Fix A Leaky Shower Faucet:
If you have already replaced the washer , cartridge or even the complete shower body and when you shut your shower off you still have a leaky shower faucet or shower head then you you can fix this by removing the mineral buildup inside of the shower head or faucet. What happens is over time the water will leave deposits in the openings in the shower head or faucet and then over time then will start to clog. The shower head is designed to drain fast so that it does not drip all night, but if you have a shower head that is built up with mineral deposits then whats happens is the water that is left over in the shower head after you close the valve will take longer to drain because it is all clogged with minerals. To fix a clogged shower head, remove the shower head and soak it in some mineral remover.Mineral removers for shower heads and faucets can be found anywhere online or in retail stores. You might also want to think about installing a house house water filter to remove those minerals right from the start so you will not have this problem in the future.
How To Fix A Leaking Tub Faucet:
The tub faucet is basically the same thing as the bathtub faucet but rather just a shorter way to say bathtub is to say “tub”. So if you are looking to learn how to fix your bathtub from leaking or dripping then follow the instructions in this guide.
How To Fix A Leaking Outdoor Faucet:
The outdoor faucet known commonly as the hose bib or the hose spigot. This type of faucet has “packing” around the valve stem and can be tightened by using a pair of channel locks. Be careful not to over tighten the packing nut because this will make the valve to hard to open because you will be the pushing the packing down to much resulting in a locked valve stem.
How To Change Faucet Washer And Seat:

You will need some tools to completely remove a washer and faucet seat. You will need a Philips head & Flat head screw driver as well as a seat removal tool which is basically a metal rod with a special tip that fits inside the seat.
Here is a step by step guide on how to remove and replace the washer and seat.
1) Remove the faucet handle. You will most likely have to remove the hot and cold inserts that cover the screws. Once you remove them remove the screw and pull the handle off.
2) Once you have removed the faucet handle you will not want to remove the faucet valve stem. Depending on what type of faucet brand you have will depend on how the stem comes out but most will with have a holding nut, clip or can be spun in the reverse direction of the valve when its in the on position.
3) Once the stem is removed you will want to flip it over and unscrew the brass washer screw out of the bottom of the stem. Once the washer screw is removed you can remove and then replace the washer. If you do not have any washer left or if your even missing the brass screw then do not worry as you can buy a new washer screw for the stem. It is also very important to make sure the seat of the stem is not worn or in fact you will have to replace the stem.
4) Once you have replaced the washer on the stem you will now want to change the faucet washer seat.Using your seat removal tool turn the seat counter clockwise and remove the seat.
5) Once you have changed the seat and the washer you can put the faucet back together knowing that your faucet will now be drip free.
This concludes our leaky faucet workshop. We hope you enjoyed the lesson.

Good post! We are linking to this great article on our site.
Keep up the good writing.
Extremely exciting article
What’s up friends, its wonderful paragraph about cultureand fully explained,
keep it up all the time.
Yes! Finally something about apartment size range.
Having read this I thought it was extremely enlightening.
I appreciate you spending some time and energy to put this short article together.
I once again find myself personally spending way too much time both reading and commenting.
But so what, it was still worth it!
I’m excited to uncover this site. I want to to thank you for ones time just for this wonderful read!!
I definitely savored every part of it and i also
have you saved to fav to see new things on your blog.