Hayward Super Pump Repair Guide
Hayward is very well known in the swimming pool industry for the great quality swimming pool products they make. One of their most popular lines of swimming pool pumps is called the Hayward Super Pump. This pump is offered in both the Super Pump Standard and The Super Pump II. The Super pump is installed in millions of backyards all over the world and is well known for its long lasting life.
Even though the Hayward Super Pump is one of the top pumps in the industry, the daily use of this pump will eventually require troubleshooting and Hayward Super Pump repair. These repair are not that hard to do yourself if you are the hands on kind of repair person. If you are not comfortable working on with basic hand tools you could always bring the pump down to a local repair shop and have them diagnose and fix your pump. Things like the mechanical pump seal, pump bearings, pump gaskets and so on will have top be replaced along the way. Most of these things can be repaired in a few hours with replacement Hayward parts that are generally sold at your local swimming pool supply store.
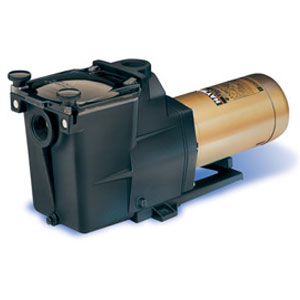
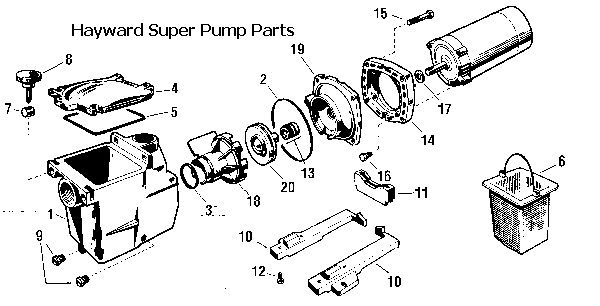
Below you will find the most common things that will have to be repaired on the Hayward Super Pump swimming pool pump. Most of the repairs on this pump can be preformed with a 9/16″ inch socket or wrench, a Flathead screwdriver and a pair of channel lock pliers.
How To Change The Super Pump Seal
The Hayward Super pump uses a two part mechanical seal to protect the motor from the wet end of the pump. This seal can be replaced in a few small steps and will only take an hour or two if you have a set of wrenches and some other basic hand tools.
The first thing you will want to do is to disconnect the pump and drain it free of any water that may be in the volute. You can do this by removing the two drain plugs on the pump. One will be in the front of the pump and one will be on the side. Once the pump is drained out you will want to remove the four 9/6 bolts that connect the Hayward Pump housing to the motor bracket. Once you do this pump housing will separate from the motor end of the pump and you will now see the impeller. Grab hold of the impeller and turn it counter clockwise until it spins off of the pump motor shaft. You may have to hold the other end of the pump shaft with a pair of pliers. You can do this by removing the back motor cover. Now that the impeller is off of the motor shaft you will able to see both parts of the pump seal. Slide the pump seal spring off of the impeller and place it to the side. You will be replacing this with the new one in a few minutes. The second part of the Hayward mechanical pump seal is located in the pump seal housing. You will now need to take your finger and pull the ceramic seat from the seal housing. This ceramic seal seat will be wrapped with a black rubber washer, make sure you also remove that from the pump seal housing.
Now that you have both parts of the seal removed from the pump you can replace both parts of the seal with the replacement Hayward Super Pump seal. When re-inserting the ceramic seat you may want to put a small amount of silicon on the rubber casing to ensure that you will not have a leak. You can now screw the impeller back onto the pump shaft and re-attach the volute to the motor of the pump. Make sure you prime the Hayward Super Pump before you run it by filling the wet end of the pump with water before turning it on.
How To Prime The Hayward Super Pump:
The Hayward super pump is considered a self-priming swimming pool pump but this does not mean that the pump will actually prime itself if dry. When any type of swimming pool pump is dry you will have to fill the volute of the pump with water. This will allow the pump impeller to create a suction draw and start to pull the water from the swimming pool plumbing.
To prime the Hayward Super Pump you will just need a bucket of water or a garden hose. The first thing you will want to do is to remove the Super Pump Cover or also know as the pump basket cover. This lid will be made from clear plastic and will have two black handles knobs on each side. To remove the pump cover you will have to loosen each knob counter clockwise until the fold to the side. Once the knobs are loose you can remove the pump cover.
Now that the cover is off of the super pump volute also know as the wet end of the pump, you can take your bucket of water and pour it into the pump until the pump basket area is completely full of water. Now that the pump is full of water you can put the cover back onto the volute of the Hayward Super Pump. You swimming pool pump is now considered to be primed and you can now go ahead and turn on the pump. It may take a few minutes for the pump to fully be up to prime once it’s running.
How To Install The Hayward Super Pump
There are two fitting connections on the Hayward Super Pump housing. These inlets can be either 1.5″ inches or 2″ inches depending on the horsepower and size of your super pump. You will need to connect both side of the pump to your swimming pool system. On the front of the Hayward Super Pump is the suction side inlet. You will want to connect this side of the pump to the suction side of your swimming pool plumbing. The suction side of the swimming pool system is the side that has the main drain and skimmers hooked up to it. Some pools will not have a main drain, but every pool will have a skimmer or two. The suction side of the Hayward Super Pump will connect to the skimmer and the main drain.
On the top of the Hayward Super Pump is where you will find the discharge fitting connection. The discharge side of the super pump will get connected to the discharge side of your swimming pool system. The discharge side of the swimming pool system powers the swimming pool returns, pool vacuums and sometimes the pool slide or water fall if they are installed on the pool. Usually the discharge side of the Hayward Super Pump will get directly plumbed into the pump side of the multi-port directional valve and then the multi-port will connect to the discharge side of the pool plumbing. Once the both the suction side and the discharge side of the Hayward Pump are connected you can prime the pump and start it up making sure it reaches a full prime.
How To Drain The Hayward Super Pump
Draining the Super pump can be fast and easy to do. You will want to grab a 9/16″ box wrench or adjustable wrench and remove the two drain plugs that are on the bottom of the Hayward pump housing. You will find one drain plug on the from of the pump housing and one on the side. Once the water stops draining from the drain plugs holes your pump will now be drained.
How To Change The Hayward Pump Cover Gasket:
The pump cover gasket is easy and fast to change. This gasket often has to be replaced every few years because of all the opening and closing of the pump cover. The replacement of this gasket is part of the normal maintenance of the super pump. To install a new Hayward pump cover gasket you will need to remove the pump cover from the pump housing of the pump. You can do this by turning the two black hold down knobs counter clockwise until you can fold them to the side, so you can lift and remove the cover.
Once you have the cover off of the pump housing you can take a Flathead screwdriver and pry out the old pump cover gasket. Sometimes they melt or can be stuck, so you may have to do a bit of scraping if your gasket is really old. Most of the time the pump cover gasket will just pull right out. Once you have fully removed the old pump cover gasket you will want to insert the new gasket by firmly pressing the gasket into the groove on the pump housing. Once the gasket is set in place you can re-install the pump lid and re-start your pump, your cover gasket is now changed.
How To Change The Super Pump Motor Bearings:
If your super pump is “screaming” or making lots of noise chances are you will need to replace the motor shaft bearings that are inside of the motor. To do so you will have to remove the motor end from the pump housing. Once you have the motor removed from the pump housing you can remove the impeller and the pump seal housing. Now that the pump seal housing, the impeller and everything has been removed from the motor end you can start to take apart the motor.
You will need to remove the pump motor through bolts and then remove the front and the rear cover from the motor casing. Once the through bolts and the covers are removed you slide the motor armature shaft out from the casing. Once you removed the motor armature you will have to remove the old motor bearings and then press on new ones. Once your new bearings are pressed on to the motor armature shaft you can start to re-assemble the super pump in the reverse order that you took it apart. Take your time and put it back together the correct way. Do not forget to replace the water sling on the motor as well.
Super Pump Troubleshooting and Common Problems:
Problem: “My Hayward Super Pump Will Not Prime”
Solution: You will always want to make sure you have no air leaks in the suction side of the pump or the swimming pool plumbing. This can cause the pump not to prime. Make sure the unions and the pump cover are tight. Also make sure to fill the pump housing with water before starting the motor.
Problem: “I have air inside my pump cover and bubbles in my swimming pool.”
Solution: When you have air coming out of your swimming pool returns this means that your pump is sucking air from somewhere. Check your suction fitting and drain plugs to make sure they are tight and not leaking. You also will want to make sure you pump housing cover lid is good as well.
If You Have Any More Questions Or Problems Please Ask:

HELP!!!! I am having a major problem with my pool vacuum and Hayward pump. The pump primes fine and works correctly BEFORE I hook up my vacuum hose. Once I get the vaccum started, the pump loses prime after only 1-2 minutes. I have purchased a new hose, new cuff fittings, ensured that there is a good seal between vacuum head and hose and suction disk and hose that goes into skimmer. Before I could get no suction at all on the vacuum but since replacing the house I at least get suction even if its only for a minute or two. The pump loses prime if I try to vacuum to filter or waste. Any ideas?
Hi Linda,
Its your filter getting clogged,
Turn the multiport valve to “waste” as you vacuum and the dirty water will pump out of the pool. You will need to add some water while vacuuming to the pool. You can do this with your garden hose.
Please let me know if you need more help, also make sure to always check your skimmer baskets while vacuuming,
Joseph
I’m having the same problem as Linda. Am vacuming to waste,water level above hose collar in skimmer, loosing pressure almost immediately. WHY?
Hi Laurin,
Are you sure that the skimmer basket below the vacuum disk is empty? Remember as you vacuum all the debris will go into the basket. As the basket fills the suction will decrease.
Let me know if you need more help,
Joseph
Skimmer basket at inlet is removed to allow for vac hose. Do you mean the basket at the pump? That is empty. Losing pressure as soon as hose is inserted in skimmer inlet.
Hi Laurin.,
Are you priming the pool hose with water first before hooking it up? If so , how are you priming the hose? Sounds like you have air in your hose.
Let me know if you need more help,
Joseph
Priming the hose with return line from filter, No air in hose.
Is this an above ground swimming pool or an in ground?
Linda- my bet is that your hose collar is leaking an sucking air in. To test wrap it tightly with plastic wrap and then see if you lose prime. Cheap hoses never hold their collars well.
You can also wrap it with duct tape as ashore fix if the plastic wrap test works.
I have a Hayward Super Pump connected to my in-ground pool. The pump is controlled by an on/off switch. I recently opened the pool and the pump motor was turning on and off by the switch. When I went to turn off the motor to switch from filter to backwash the motor did turn off completely. In the on position there was full power, in the off postion the motor was still running but only at partial power. Thinking that the on/off switch was bad I replaced it but the motor is still acting the same. To shut the motor completely off I have to trip the breaker. Is something in the motor malfunctioning? If so, what could it be? And is it easily repaired without having to take the pump apart and take it to a repair center?
Hi Gary,
Are you running the pump on 11oV or 220V?
Let me know,
Joseph
Hi Joseph,
I am running 110V and it is a 1HP motor.
I have a Hayward 1/2hp that shuts off after running for five minutes. It then starts up again after twenty minutes or so only to shut down after running for five minutes. The housing is hot to the touch. Any suggestions would be appreciated.
Hi Ed,
How does the motor sound?
Please let me know, and I can help you further,
Joseph
Hello,
I am trying to get the bearings for the superpump but none of the dealers have them and say I have to replace whole pump. I know I ca do the job but do you have the size of the bearings?
Thank You.
Hi Joseph,
Thanks for getting back to me. The motor sounds fine when its running. I use this particular pump throughout the year to pump out water that builds up under the pool. It runs 365 days a year on a timer which is set for constant running in the winter and one hour on, three or four hours off,the rest of the year. I’ve had the motor for four years now. Like I said before it runs well and sounds ok when its pumping but lately its been shuting off after five minutes of work. I’ve been told to check out the capacitor but thought i’d ask you first.
Thanks again,
ED
ps its a Hayward 1.5 HP, FR tag M56J, 230/115 volts
Hi Ed,
I would also recommend changing the capacitor and also make sure to inspect the wire connections for rot and also check the motor switch contacts for wear.
Let me know if you need more help,
Joseph
How can I determine whether the power line is 110 o 220? I opened my pool three weeks ago and the drive shaft was bound. Ended up having to get a new motor. Installed a new motor and it kept shuting off. Took the pump off and took it back to the dealer where they just changd the volt requirements from 220 to 110. Came back home and put the motor back in and turned it on. The motor ran for less than 2 hours and stopped. The breaker was not thrown it was definitely the motor. Took it back and they had to replace the motor again. They were very specific to make sure that the voltage is 110 if the motor is set for 110 but how can I be sure. The breaker is 20 amp breaker and there is only 1 main going into the breaker. I thought that meant it was only 110.
Please help, I want my pool. Tera
I’m starting my pool for the first time this season. When I turn on the Hayward motor, it hums for about a minute and then turns off. I know it automatically shuts off to keep from overheating. The troubleshoot guide says “1. Governor stuck in open position.” and “2. Open capacitor.” Where is the governor located and how can I tell if it’s stuck? And do I replace it, or simply unstick it? Where’s the capacitor? How do I determine if it’s “open” (which I know is an electrician term, not a state-of-being)? Thanks!
Hi Jeff,
They are referring to the motor switch on the rear of the motor. You will need to remove the rear cover of the motor and then you will see the motor switch,
Let me know if you need more help,
Joseph
Joseph,
Thanks! I opened up the rear of the motor, removed the capacitor, and have repeatedly tested it. Sometimes it’s fine, sometimes it’s not. As it’s relatively cheap ($13) I’ll replace it. I understand that the governor is the switch…the two pieces of copper that form the letter V (?) So, how do I tell if it’s stuck, and if so, how do I unstick it?
Jeff
I know my capacitor may have “low dialectric leakage,” as it only gets about 1/2 way to zero. But I can’t be sure until I get another one to test it against.
I had the same problem with my inground pool. I tried everything you have been told and it did not work. I ended up adding more water to the pool and it worked fine. I assume the water wasn’t deep enough in the skimmer to maintain suction. I have had no problems since! Good luck!
Hi Micheal.
That’s a really good point, I will mention that to everyone in the future as well, Its silly of me to just assume the water level in everyone’s pool is correct. Troubleshooting pools from the internet sometimes gets me in a spin :) But yes, if the water is not at least “mid skimmer” the pump can suck air through the skimmer itself.
So, if anyone else reads this, please check your water level and make sure it is mid skimmer.
Thanks so much and
Joseph
The Pressure guage on my pump is showing 20, I know it should be at between 13& 118. Can you tell me what could be the trouble. I take good care and dont want the motor or ect to go bad.
Thanks Soo much
Linda
Hi Linda,
You need to back wash the filter, That will lower the pressure.
Joseph
Hi Joseph
Thanks for getting back to me, I did backwash and then I loosened the filter cap to let water out, put lid back on and backwashed again,it still stayed at 20 percent pressure.
Does the sand being low have anything to do with the pressure.
Thank You again
Linda
Hi Linda,
Yes, the sand amount could make the pressure flow different, but let me ask you, How is the flow to the pool now? Is the flow out of the return jet strong?
Joseph
Joseph
The pressure is not as strong as it usually is. But still a lot of push to it.
Thanks
Linda
when turning on the pump, it worked fine…then hummed….so i hit the breaker and it just hums. its a year old…does it get hot and shut down automatically?
Hi Bob,
I would change the capacitor,
Let me know if you need more help,
Joseph
My pump is leaking from the slot in the bottom of the pump, on the motor side?
Hi Derick,
That means that the mechanical seal has gone bad and you need to replace it,
Let me know if you need more help,
Joseph
Thank you, is it easy to replace, I did take the back part off and tryed to get the impeller off but I could not get a good grasp on the shaft, also the screw at the end would not come off.?
Hi Derrick,
Hold the back of the shaft with a screwdriver (large tipped) or a open end wrench. The back of the shaft has a slot in it for a screwdriver and also has two flat spots so you can hold it back with a wrench,
Let me know if you need more help,
Joseph
Just replaced my 30 yr old pump. Was looking forward to my new improved Hayward pump. The old one was a hayward too. Everything seems fine – except the pump runs as loud as an airconditioner. It is an inground pool and the pump is 1 hp. The dealer says that pumps are loud and that 115 v runs louder thanif i ran it on 220v. Is this true. It is only 3 days old and I thought the pump would be at most a loud hum. Just looking for suggestions, or comments. Thanks
Dale,
Might be time to build a small “pool and filter house”. Think of a small dog house on top of your filter system,
Was the motor made in USA OR CHINA?
Let me know and I hope this helps,
Joseph
Thanks – lucky to have the pool equipment shop owner just a few miles from the house. Came on over after kindly listening to my complaint. He was skepticle but when he showed up – listened one second and said he will bring a new one over next day. The bearings were bad. Imagin – brand new and that happens. New one in already – super quiet. When I hit the switch, I thought it failed to go on but was sooo quiet it fooled me. Now I can’t tell when its on or not from inside house or on porch. Loving it!
-Dale
Hi,
I am having problems with my superpump 3/4 HP on 115 Volts. It comes on at half speed for a few minutes and then the heat sensor cuts it off, it will run at full power in spurts during this time but not continuously. What is going on?
hello.
i have a hayward pump model c48k2ni43a4 and the capacitator just busted, i took another capacitator from another pump and now the motor just hums.and does not turn.
is the motor fininshed or is the capacitator the worng kind. what is the right one to buy as the old one identification is not visible.
thanks