Hayward Super Pump Repair Guide
Hayward is very well known in the swimming pool industry for the great quality swimming pool products they make. One of their most popular lines of swimming pool pumps is called the Hayward Super Pump. This pump is offered in both the Super Pump Standard and The Super Pump II. The Super pump is installed in millions of backyards all over the world and is well known for its long lasting life.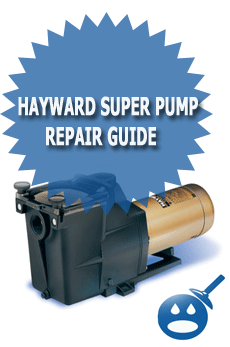
Even though the Hayward Super Pump is one of the top pumps in the industry, the daily use of this pump will eventually require troubleshooting and Hayward Super Pump repair. These repair are not that hard to do yourself if you are the hands on kind of repair person. If you are not comfortable working on with basic hand tools you could always bring the pump down to a local repair shop and have them diagnose and fix your pump. Things like the mechanical pump seal, pump bearings, pump gaskets and so on will have top be replaced along the way. Most of these things can be repaired in a few hours with replacement Hayward parts that are generally sold at your local swimming pool supply store.
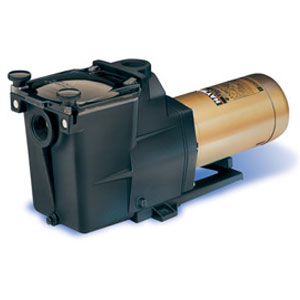
Below you will find the most common things that will have to be repaired on the Hayward Super Pump swimming pool pump. Most of the repairs on this pump can be preformed with a 9/16″ inch socket or wrench, a Flathead screwdriver and a pair of channel lock pliers.
How To Change The Super Pump Seal
The Hayward Super pump uses a two part mechanical seal to protect the motor from the wet end of the pump. This seal can be replaced in a few small steps and will only take an hour or two if you have a set of wrenches and some other basic hand tools.
The first thing you will want to do is to disconnect the pump and drain it free of any water that may be in the volute. You can do this by removing the two drain plugs on the pump. One will be in the front of the pump and one will be on the side. Once the pump is drained out you will want to remove the four 9/6 bolts that connect the Hayward Pump housing to the motor bracket. Once you do this pump housing will separate from the motor end of the pump and you will now see the impeller. Grab hold of the impeller and turn it counter clockwise until it spins off of the pump motor shaft. You may have to hold the other end of the pump shaft with a pair of pliers. You can do this by removing the back motor cover. Now that the impeller is off of the motor shaft you will able to see both parts of the pump seal. Slide the pump seal spring off of the impeller and place it to the side. You will be replacing this with the new one in a few minutes. The second part of the Hayward mechanical pump seal is located in the pump seal housing. You will now need to take your finger and pull the ceramic seat from the seal housing. This ceramic seal seat will be wrapped with a black rubber washer, make sure you also remove that from the pump seal housing.
Now that you have both parts of the seal removed from the pump you can replace both parts of the seal with the replacement Hayward Super Pump seal. When re-inserting the ceramic seat you may want to put a small amount of silicon on the rubber casing to ensure that you will not have a leak. You can now screw the impeller back onto the pump shaft and re-attach the volute to the motor of the pump. Make sure you prime the Hayward Super Pump before you run it by filling the wet end of the pump with water before turning it on.
How To Prime The Hayward Super Pump:
The Hayward super pump is considered a self-priming swimming pool pump but this does not mean that the pump will actually prime itself if dry. When any type of swimming pool pump is dry you will have to fill the volute of the pump with water. This will allow the pump impeller to create a suction draw and start to pull the water from the swimming pool plumbing.
To prime the Hayward Super Pump you will just need a bucket of water or a garden hose. The first thing you will want to do is to remove the Super Pump Cover or also know as the pump basket cover. This lid will be made from clear plastic and will have two black handles knobs on each side. To remove the pump cover you will have to loosen each knob counter clockwise until the fold to the side. Once the knobs are loose you can remove the pump cover.
Now that the cover is off of the super pump volute also know as the wet end of the pump, you can take your bucket of water and pour it into the pump until the pump basket area is completely full of water. Now that the pump is full of water you can put the cover back onto the volute of the Hayward Super Pump. You swimming pool pump is now considered to be primed and you can now go ahead and turn on the pump. It may take a few minutes for the pump to fully be up to prime once it’s running.
How To Install The Hayward Super Pump
There are two fitting connections on the Hayward Super Pump housing. These inlets can be either 1.5″ inches or 2″ inches depending on the horsepower and size of your super pump. You will need to connect both side of the pump to your swimming pool system. On the front of the Hayward Super Pump is the suction side inlet. You will want to connect this side of the pump to the suction side of your swimming pool plumbing. The suction side of the swimming pool system is the side that has the main drain and skimmers hooked up to it. Some pools will not have a main drain, but every pool will have a skimmer or two. The suction side of the Hayward Super Pump will connect to the skimmer and the main drain.
On the top of the Hayward Super Pump is where you will find the discharge fitting connection. The discharge side of the super pump will get connected to the discharge side of your swimming pool system. The discharge side of the swimming pool system powers the swimming pool returns, pool vacuums and sometimes the pool slide or water fall if they are installed on the pool. Usually the discharge side of the Hayward Super Pump will get directly plumbed into the pump side of the multi-port directional valve and then the multi-port will connect to the discharge side of the pool plumbing. Once the both the suction side and the discharge side of the Hayward Pump are connected you can prime the pump and start it up making sure it reaches a full prime.
How To Drain The Hayward Super Pump
Draining the Super pump can be fast and easy to do. You will want to grab a 9/16″ box wrench or adjustable wrench and remove the two drain plugs that are on the bottom of the Hayward pump housing. You will find one drain plug on the from of the pump housing and one on the side. Once the water stops draining from the drain plugs holes your pump will now be drained.
How To Change The Hayward Pump Cover Gasket:
The pump cover gasket is easy and fast to change. This gasket often has to be replaced every few years because of all the opening and closing of the pump cover. The replacement of this gasket is part of the normal maintenance of the super pump. To install a new Hayward pump cover gasket you will need to remove the pump cover from the pump housing of the pump. You can do this by turning the two black hold down knobs counter clockwise until you can fold them to the side, so you can lift and remove the cover.
Once you have the cover off of the pump housing you can take a Flathead screwdriver and pry out the old pump cover gasket. Sometimes they melt or can be stuck, so you may have to do a bit of scraping if your gasket is really old. Most of the time the pump cover gasket will just pull right out. Once you have fully removed the old pump cover gasket you will want to insert the new gasket by firmly pressing the gasket into the groove on the pump housing. Once the gasket is set in place you can re-install the pump lid and re-start your pump, your cover gasket is now changed.
How To Change The Super Pump Motor Bearings:
If your super pump is “screaming” or making lots of noise chances are you will need to replace the motor shaft bearings that are inside of the motor. To do so you will have to remove the motor end from the pump housing. Once you have the motor removed from the pump housing you can remove the impeller and the pump seal housing. Now that the pump seal housing, the impeller and everything has been removed from the motor end you can start to take apart the motor.
You will need to remove the pump motor through bolts and then remove the front and the rear cover from the motor casing. Once the through bolts and the covers are removed you slide the motor armature shaft out from the casing. Once you removed the motor armature you will have to remove the old motor bearings and then press on new ones. Once your new bearings are pressed on to the motor armature shaft you can start to re-assemble the super pump in the reverse order that you took it apart. Take your time and put it back together the correct way. Do not forget to replace the water sling on the motor as well.
Super Pump Troubleshooting and Common Problems:
Problem: “My Hayward Super Pump Will Not Prime”
Solution: You will always want to make sure you have no air leaks in the suction side of the pump or the swimming pool plumbing. This can cause the pump not to prime. Make sure the unions and the pump cover are tight. Also make sure to fill the pump housing with water before starting the motor.
Problem: “I have air inside my pump cover and bubbles in my swimming pool.”
Solution: When you have air coming out of your swimming pool returns this means that your pump is sucking air from somewhere. Check your suction fitting and drain plugs to make sure they are tight and not leaking. You also will want to make sure you pump housing cover lid is good as well.
If You Have Any More Questions Or Problems Please Ask:

Hello,
I have a Hayward Super2 pump which is getting close to 10 years old. It runs everyday (4-5 hours), year round.
I noticed water leaking between the motor and pump flanges, so I replaced the seal in the pump housing, shaft seal and the defuser seal. I put it back together and it still leaks. It is leaking less but it looks like its leaking between the flange on the pump housing and the other plastic flange that gets sandwiched between the pump housing and the motor flange. Any ideas??
Hi Jim,
Did you apply gasket seal / silicon when install the new seal “seat”, this is required when changing the seal,
If you have any questions, let me know
Joseph
Hi Joseph,
I put gasket seal on when I replaced the housing gasket, however that was my first attempt to solve the problem. Because it was still leaking I purchased the shaft seal and defuser gasket. I did put gasket seal on the new defusergasket but I neglected to clean and reapply gasket seal to the pump housing gasket when I reassembled it. I will certainly take it apart and pay better attention when reassembling this time. I’ll let you know if that works.
Bob at the pool store where I picked up the parts asked if it had overheated and possibly warped. I can’t say that I notice anything that looks warped or discolored, and the motor windings don’t smell like they’ve been hot. The pump is between the heater, filter, house and the controll panel blocks access. It really difficult to get a good look at the pump housing face. I’m thinking I’ll try to check it with straight edge (stainless steel ruler). I just don’t know if I can get close enough to see if it’s straight or not, without wrenching my back or getting stuck in a very compromising postion. I don’t have torque wrench to tighten down the bolts that fasten the motor to the pump. I’m using a ratchet wrench with an 8″ long handle. I’m afraid of over tightening the bolts. I can see where the gap looks tight, they feel tight enough. I even tried to tighten the bolts a little more while it was running to see if it had any affect on how it was leaking. No effect. I can still turn them but I don’t want to strip the threads or crush the plastic flange between the pump body and the motor flange. Do you know how much to torque these bolts? I can borrow a torque wrench from the engineering lab where I work if necessary.
Also, when I took the pump and motor apart there was no defuser gasket to be found. Can you tell me what purpose the defuser gasket serves?
Last question, should I be concerned about the motor bearings. They seem fine (smooth and quiet) but they do have a lot of miles on them. I’m thinking just let run until it starts making noise, or is it better to do some preventative maintenance now.
Hayward Super Pump Hum.
My Hayward Super Pump will not restart unless it completely cools down. If I try to restart within an hour or so of it shutting off, all I get is a nasty hum and eventually it will kick the breaker. Is it a capacitor problem?
Any direction would be a appreciated.
Jeff
Hi Jeff,
It could be the capacitor but that also could be a bad set of motor windings.
I would first check the capacitor.
Let me know if you need more help,
Joseph
Joseph,
Is there a way to test the capacitor I have or should I just swap in a new one?
If that does not solve my problem can I assume it is the motor windings and I guess I should go back to Hayward about the issue?
Thanks
Jeff
Hi Joseph,
Great site – tons of useful info – thanks.
I have a Hayward Super II Pump that has been running for 6 -7 years. Over the last week, it kicks on and runs fine for a short period of time then it shuts off. I assumed it was the heat switch and the first day or so when it cooled it kicked back on but now it doesn’t kick back on until I throw the breaker and the on/off switch. I opened the back and the switch looks ok (don’t have a meter to test the capacitor). My question, the motor sounds like it is running fine when on (no noises indicating bearings etc). any ideas on what to check next?
Thanks,
RayC
Hi Ray,
Have you checked the capacitor and also the switch contacts?
Let me know, Thanks for the nice words about the website, tell your friends and neighbors ;-)
Joseph
Hi Joseph,
I found where my pump is leaking. The pump housing/basket has a hairline crack between the flange and the threaded hole where the outlet pipe threads into the housing (right next to the caution label which says not to over tighten the pipe). It’s a small leak and now we are thinking it’s been that way for a while. It happens to by right over a drain that flows into the storm sewer so it’s really not causing a problem except for our water bill. We’ve debated about the amount of water and frequency we have to add to pool since we had it re-done about 4 years ago. We live in San Diego and now the city is cracking down on water usage. The obvious solution would be to replace the housing. Are you aware of any methods to repair this type of crack? Thanks Jim
Joseph,
Thanks for all the great troubleshooting info. My problem is of the “humming” pump variety. It hums for 3-4 seconds and then stops. I’m assuming something overheats. 30 seconds or so later, it it hums again, 2-3 seconds and then stops. 35-40 seconds later (a longer delay) it hums again and then 1-2 seconds later (a shorter attempt at starting up) it stops.
I was able to turn the shaft just by placing my hand through the skimmer area in towards the impeller prior to taking the pump apart. The shaft turns easily from the dry side at the centrifugal switch.
I’ve checked the eletrical connections with a volt meter. There are two hot lines to the pump (one at 120 and the other at 220). The pump appears to be set for 220 (the moveable connector inside the dry side seems to be in the 220 position). But I’m confused, as the connection seems to be set up so that when the moveable conector (when lining the arrow up with the 220 position) only connects one of the lines instead of both. Does that make sense and/or seem strange?
I can’t make heads or tails of your “centrifugal switch” picture, so I don’t know what I’m looking for there, although it does appear that the springs are a little bit worn (bent). Which way should the switch be when the pump is not running? I don’t have any power applied to the pump.
The capacitor, if I’m testing it correctly, appears to hold at 12-13 ohms (I never see it go to zero, or if it does, it comes up quickly to 12-13 ohms and then stays there). I’m assuming the capacitor is the cylindrical shaped device to the side of the centrifugal switch with a clear plastic cover over it, which I bent out of the way to get at the contacts.
After all this troubleshooting, I am thinking the capacitor must be bad. Would you agree, and if so, where would you recommend getting a new one ASAP? Do you sell parts?
Thanks again for all the great info and your time. Sorry this message is so long; I wanted to give you as much info as possible.
Scott Evans
Ooops, I meant 240 not 220 when referencing the voltages in this post. I didn’t pause to read an exact value, but it was over 240….
Scott
Hi Scott,
I would suggest first replacing the capacitor if you tested it and it seems bad.
I would also suggest checking the contacts on the pump switch,
Let me know if you have any more questions.
Joseph
Joseph,
Do you have suggestion(s) for locating/purchasing a new capacitor? I am in 107 degree heat and need to get this fixed quick or the pool will turn to pond scum quickly…….
Scott
Hi Scott,
What is your zip code?
Let me know and I can try to locate one for you .
Joseph
Thanks Joseph,
I’m in a small town (Del Rio, Tx) with zip code 78840. I’m 3 hours from San Antonio and thinking I will have to take a day off work to go to San Antonio and back.
Let me know what you find out.
Scott
Scott,
You can also order the part online,
Joseph
Joseph,
I took the capacitor out to try and find a replacement. I decided to test it again and it it tested GOOD. I must have done it wrong yesterday when it was still connected to the pump. Where do you suggest I look now?
Scott
Now I re-assembled and tested again. As before the reading is 12 Ohms. Should the test be done with the capacitor connected to the pump or with it removed?
Scott,
I would check the switch position and the connects, If the switch is good, check the connections on the terminals.
Joseph
The switch has been funny I have to turn it on twice sometimes. Today I turned it on and it just made a click noise in the motor and now I can’t get anything. i am not sure if the motor ceased or the switch is bad. Who repairs these in my 48390 zip code area?
Hi Michelle,
Here are some places you could call in your area.
http://maps.google.com/maps?oe=utf-8&rlz=1R1GGGL_en___US326&client=firefox-a&um=1&ie=UTF-8&q=pump+and+motor+epair+48390&fb=1&split=1&gl=us&view=text&ei=EqpcSrDsD4LONZqssK4C&sa=X&oi=local_group&ct=more-results&resnum=1
Hope this helps,
Joseph
Have a rental property with a pool – Hayward Super Pump. Recently reconnected all the hoses, etc after winter and fired it up. Ran for a while then shut off. I had forgotten to put the filter basket in and discovered leaves etc clogging up the impeller. Cleaned it up a bit and turned it back on – water flowed VERY well, but shut down in about 20 seconds. Waited for several hours (housing was VERY hot to the touch) and had the tenant turn it on. Ran for about 40 seconds and shut off again. Water DOES flow very well, just keeps shutting off. This pump was installed by a previous tenant, and worked fine when i saw it in action. Any thoughts? Thanks.
Hi Drew,
I responded to you here to make things easy.
http://wetheadmedia.com/have-a-rental-property-with-a-pool-hayward-super-pump/
Please let me know if you have any more questions,
Joseph
PS You can ask me questions on that page ;-)
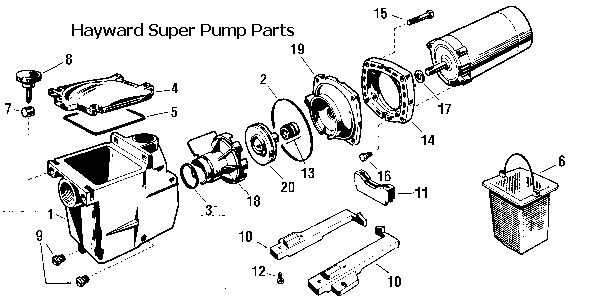
I see the parts breakdown listed but where can I buy the individual parts? My motor keeps overheating and I’d like to replace just the motor if that’s what I find is dying, thanks
Hi Jim,
I would recommend http://poolandspa.com
Just let them know that WeT Head Media sent ya, and they will take good care of you.
Joseph
hi , my problem is the circuit breaker kicks out right away i took the moter off checked impeler and it moves freely . thanks in advance
Folks
I have a question about a Hayward SUper II Pump. Using a 50′ length of 12G wiring, the pump was wired to plug into an outlet.
The pump will turn on and circluate water for ~3 minutes then shut off for about 3 minutes. Eventually it will cylce to ~ 1minute on and 3 minutes off.
Any help would be appreciated.
Rich
Hi guys, the timer seems to work for about 2 days ,then it blows a fuse. I have it on to run six hours,any ideas,thanks Gary
Can anyone help? What does it mean when you turn the pump on and it just whirrrsss???
Hi Lynn,
I can’t find the word “whirrrsss” in the dictionary ;-)
What does that mean, Let me know and I can be of more help,
Joseph
Whirrrsss, might not be a word in the dictionary, but my pump is doing the same thing.
Any ideas?
I have a 1/1/2 hp super pump the motor turns and no water moves in the pump like the propeller broke so can I replace that my self?
Hi Karen,
If you consider yourself handy and have some hand tools you can do this yourself. One thing to remember is when you replace the Hayward Super Pump impeller you will also want to replace the mechanical seal as well.
Let me know if you need any additional help,
Joseph
First of all this is an awesome site. Only place on the web that I am confident that I would get the correct answer. I just saw the video of using the hammer to loosen any debris or surface rust and that might be worth a try for my issue.
I have a Super II Pump and it’s been working fine no problem for the past 3 years. Now the pump has stopped running. At first I thought it was the breaker but all were switched on, so then I thought it was the overheating and that’s why it wouldn’t turnover. But after waiting for a few minutes the pump turned on after hitting the switch several times. There’s a quick whine when i hit the switch button but then it turned over. After a few minutes though the pump turned off again. So again I thought it was the overheating so last night I turned it off thinking that I might be able to get it to turn over this morning and haven’t been able to.
I continue to get the really quick whine sound when switching on but the pump wont turn over. Any suggestions or point me to suggestions you already made with a similar problem.
Thanks…
Christian
Hi Christian,
Thanks for the nice words about the website. ;-)
Now on to your problem:
Was your pump running quietly for the last three years or was it getting louder and louder as time when on and then it stopped working?
Please let me know and I can help you further, From what you have told me so far it sound like you could have bad motor bearings or possibly a voltage / capacitor issue.
But I need to know what the pump sounded like before it stopped working.
I also would suggest looking at this article AND the 123 comments that are PACKED with information and troubleshooting examples
Hayward Super Pump Troubleshooting & Repair Guide
Learn how to repair & troubleshoot the most common problems with the Hayward Super Pump complete with color pictures and easy to read instructions.
http://wetheadmedia.com/hayward-super-pump-repair-guide/
ALSO see this thread / articles comments after you read above:
http://wetheadmedia.com/polaris-booster-pump-troubleshooting-repair-guide/ <â€â€Â- Lots of "motor" talk there as well.
Motor Shuts OFF – Check For:
1. Undersized wiring; loose connections; etc.
2. Low voltage at motor or power drop (frequently caused by undersized wiring or extension cord use).
3. Mechanical binding and electrical overload.
NOTE: Your Hayward pump motor is equipped with an “automatic thermal overload protector.†The motor will
automatically shut off if power supply drops before heat damage can build up causing windings to burn out. The
“thermal overload protector†will allow the motor to automatically restart once the motor has cooled, provided the
power source is again up to proper levels. It will continue to cut On/Off until the problem is corrected. Be sure to
correct cause of overheating.
Motor Hums, But Does NOT Start – Check For:
1. Centrifugal switch stuck in OPEN position.
2. Binding of motor shaft.
Let me know if you have more questions, but take a look at the above as well. Please also feel free to ask more questions.
Joseph