Hayward Super Pump Repair Guide
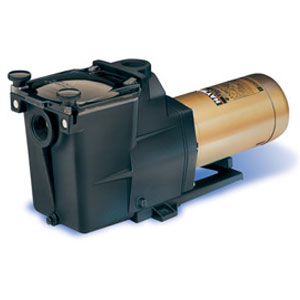
Hayward is very well known in the swimming pool industry for the great quality swimming pool products they make. One of their most popular lines of swimming pool pumps is called the Hayward Super Pump. This pump is offered in both the Super Pump Standard and The Super Pump II. The Super pump is installed in millions of backyards all over the world and is well known for its long lasting life.
Even though the Hayward Super Pump is one of the top pumps in the industry, the daily use of this pump will eventually require troubleshooting and Hayward Super Pump repair. These repair are not that hard to do yourself if you are the hands on kind of repair person. If you are not comfortable working on with basic hand tools you could always bring the pump down to a local repair shop and have them diagnose and fix your pump. Things like the mechanical pump seal, pump bearings, pump gaskets and so on will have top be replaced along the way. Most of these things can be repaired in a few hours with replacement Hayward parts that are generally sold at your local swimming pool supply store.
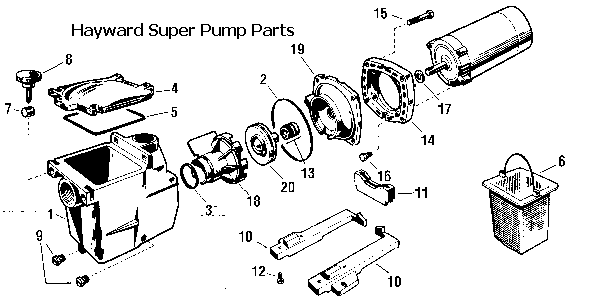
Below you will find the most common things that will have to be repaired on the Hayward Super Pump swimming pool pump. Most of the repairs on this pump can be preformed with a 9/16″ inch socket or wrench, a Flathead screwdriver and a pair of channel lock pliers.
How To Change The Super Pump Seal
The Hayward Super pump uses a two part mechanical seal to protect the motor from the wet end of the pump. This seal can be replaced in a few small steps and will only take an hour or two if you have a set of wrenches and some other basic hand tools.
The first thing you will want to do is to disconnect the pump and drain it free of any water that may be in the volute. You can do this by removing the two drain plugs on the pump. One will be in the front of the pump and one will be on the side. Once the pump is drained out you will want to remove the four 9/6 bolts that connect the Hayward Pump housing to the motor bracket. Once you do this pump housing will separate from the motor end of the pump and you will now see the impeller. Grab hold of the impeller and turn it counter clockwise until it spins off of the pump motor shaft. You may have to hold the other end of the pump shaft with a pair of pliers. You can do this by removing the back motor cover. Now that the impeller is off of the motor shaft you will able to see both parts of the pump seal. Slide the pump seal spring off of the impeller and place it to the side. You will be replacing this with the new one in a few minutes. The second part of the Hayward mechanical pump seal is located in the pump seal housing. You will now need to take your finger and pull the ceramic seat from the seal housing. This ceramic seal seat will be wrapped with a black rubber washer, make sure you also remove that from the pump seal housing.
Now that you have both parts of the seal removed from the pump you can replace both parts of the seal with the replacement Hayward Super Pump seal. When re-inserting the ceramic seat you may want to put a small amount of silicon on the rubber casing to ensure that you will not have a leak. You can now screw the impeller back onto the pump shaft and re-attach the volute to the motor of the pump. Make sure you prime the Hayward Super Pump before you run it by filling the wet end of the pump with water before turning it on.
How To Prime The Hayward Super Pump:
The Hayward super pump is considered a self-priming swimming pool pump but this does not mean that the pump will actually prime itself if dry. When any type of swimming pool pump is dry you will have to fill the volute of the pump with water. This will allow the pump impeller to create a suction draw and start to pull the water from the swimming pool plumbing.
To prime the Hayward Super Pump you will just need a bucket of water or a garden hose. The first thing you will want to do is to remove the Super Pump Cover or also know as the pump basket cover. This lid will be made from clear plastic and will have two black handles knobs on each side. To remove the pump cover you will have to loosen each knob counter clockwise until the fold to the side. Once the knobs are loose you can remove the pump cover.
Now that the cover is off of the super pump volute also know as the wet end of the pump, you can take your bucket of water and pour it into the pump until the pump basket area is completely full of water. Now that the pump is full of water you can put the cover back onto the volute of the Hayward Super Pump. You swimming pool pump is now considered to be primed and you can now go ahead and turn on the pump. It may take a few minutes for the pump to fully be up to prime once it’s running.
How To Install The Hayward Super Pump
There are two fitting connections on the Hayward Super Pump housing. These inlets can be either 1.5″ inches or 2″ inches depending on the horsepower and size of your super pump. You will need to connect both side of the pump to your swimming pool system. On the front of the Hayward Super Pump is the suction side inlet. You will want to connect this side of the pump to the suction side of your swimming pool plumbing. The suction side of the swimming pool system is the side that has the main drain and skimmers hooked up to it. Some pools will not have a main drain, but every pool will have a skimmer or two. The suction side of the Hayward Super Pump will connect to the skimmer and the main drain.
On the top of the Hayward Super Pump is where you will find the discharge fitting connection. The discharge side of the super pump will get connected to the discharge side of your swimming pool system. The discharge side of the swimming pool system powers the swimming pool returns, pool vacuums and sometimes the pool slide or water fall if they are installed on the pool. Usually the discharge side of the Hayward Super Pump will get directly plumbed into the pump side of the multi-port directional valve and then the multi-port will connect to the discharge side of the pool plumbing. Once the both the suction side and the discharge side of the Hayward Pump are connected you can prime the pump and start it up making sure it reaches a full prime.
How To Drain The Hayward Super Pump
Draining the Super pump can be fast and easy to do. You will want to grab a 9/16″ box wrench or adjustable wrench and remove the two drain plugs that are on the bottom of the Hayward pump housing. You will find one drain plug on the from of the pump housing and one on the side. Once the water stops draining from the drain plugs holes your pump will now be drained.
How To Change The Hayward Pump Cover Gasket:
The pump cover gasket is easy and fast to change. This gasket often has to be replaced every few years because of all the opening and closing of the pump cover. The replacement of this gasket is part of the normal maintenance of the super pump. To install a new Hayward pump cover gasket you will need to remove the pump cover from the pump housing of the pump. You can do this by turning the two black hold down knobs counter clockwise until you can fold them to the side, so you can lift and remove the cover.
Once you have the cover off of the pump housing you can take a Flathead screwdriver and pry out the old pump cover gasket. Sometimes they melt or can be stuck, so you may have to do a bit of scraping if your gasket is really old. Most of the time the pump cover gasket will just pull right out. Once you have fully removed the old pump cover gasket you will want to insert the new gasket by firmly pressing the gasket into the groove on the pump housing. Once the gasket is set in place you can re-install the pump lid and re-start your pump, your cover gasket is now changed.
How To Change The Super Pump Motor Bearings:
If your super pump is “screaming” or making lots of noise chances are you will need to replace the motor shaft bearings that are inside of the motor. To do so you will have to remove the motor end from the pump housing. Once you have the motor removed from the pump housing you can remove the impeller and the pump seal housing. Now that the pump seal housing, the impeller and everything has been removed from the motor end you can start to take apart the motor.
You will need to remove the pump motor through bolts and then remove the front and the rear cover from the motor casing. Once the through bolts and the covers are removed you slide the motor armature shaft out from the casing. Once you removed the motor armature you will have to remove the old motor bearings and then press on new ones. Once your new bearings are pressed on to the motor armature shaft you can start to re-assemble the super pump in the reverse order that you took it apart. Take your time and put it back together the correct way. Do not forget to replace the water sling on the motor as well.
Super Pump Troubleshooting and Common Problems:
Problem: “My Hayward Super Pump Will Not Prime”
Solution: You will always want to make sure you have no air leaks in the suction side of the pump or the swimming pool plumbing. This can cause the pump not to prime. Make sure the unions and the pump cover are tight. Also make sure to fill the pump housing with water before starting the motor.
Problem: “I have air inside my pump cover and bubbles in my swimming pool.”
Solution: When you have air coming out of your swimming pool returns this means that your pump is sucking air from somewhere. Check your suction fitting and drain plugs to make sure they are tight and not leaking. You also will want to make sure you pump housing cover lid is good as well.
If You Have Any More Questions Or Problems Please Ask:

Just purchased a hayward super pump series sp2607X10, 1 h.p. Water was leaking from the bottom of the pump. There was a small square hole and water continued to run out, never connected to power due to the water running out. There was no plug for this hole.