Waterproofing Basement Walls
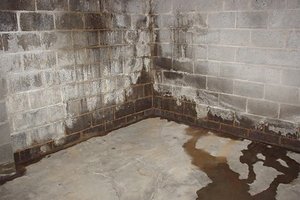
The basement of a home often makes a very useful space. However in many cases the basements in old homes become damp and leaky, which makes it unsuitable to be used as a bedroom or a recreation room. It is thus important to protect one’s basement against damp and moisture. In this article, we will discuss the various steps that are involved in waterproofing a basement.
But before we start with the actual steps, you need to know the various waterproofing options that you have when it comes to interior waterproofing or exterior waterproofing your basement walls.
Waterproofing Interior Basement Walls
Four types of basic interior waterproofing products can be found on the market; this includes 3 types of coating as well as panels and plastic sheets. Before any of these products are applied, it is important that the cracks and gaps on the walls are properly sealed.
Waterproofing Basement Walls Products
Concrete waterproofing coatings
Concrete waterproofing coatings are thick, cement-like coatings which once dried holds on permanently to the masonry and concrete walls. The coating can be applied with a brush made out of Tampico bristles made out of natural fiber to a surface that has not been painted previously. These coatings cannot be applied to any previously painted surfaces.
Silicate-based concrete sealers
Also referred to as densifiers, the silicate-based concrete sealers are only suitable for walls that have not been sealed or painted. The sealers penetrate and react chemically with the ingredients present in the brick or concrete, thereby forming a stable, waterproof surface.
As these sealers penetrate and soak in the original material, they can’t get peeled off and can be painted over. The silicate-based sealer can be applied with a roller, brush or a sprayer.
Waterproofing paint
It is a type of acrylic formula and not very different from standard wall paints. However, they are much thicker and instead of the 300 square feet area that is covered by one gallon of standard paint, the same amount of waterproofing paint covers only 75 square feet.
Panels and plastic sheets
These are suitable as waterproofing options when combined with the systems of interior basement drainage. Although they can’t stop water from entering through the wall, these waterproofing systems can protect things in the basement from getting ruined by the water.
The water that pores in through the basement walls run down the plastic’s back and the flows into the drainage system on the floor. The water is then moved out of the basement by a sump pump. The cost of installing this waterproofing procedure costs around $3000 to $5000 for a room having the dimensions of 20 feet by 20 feet.
Waterproofing Exterior Basement Walls
The best and the most effective way of waterproofing are by waterproofing the basement walls from out

side. It is also often the most expensive. Pricing for exterior waterproofing can be anywhere between $15000 and $30000.
The procedure involves excavating around the perimeter of the house to the total depth of foundation walls and installing a waterproof membrane or coating that is followed by drainage panels. These panels allow the water to pass easily down to an external French drain placed at the bottom of the foundation. The water then flows down by gravity or with the help of a sump pump to a storm drain or to another area of the property.
Basement Walls Waterproofing Steps
Here is a step-by-step guide that will teach you how to waterproof your basement walls.
- The perimeter of the house is firstly to be measured. Make sure that the ground adjacent to the foundation slopes of the house stays away from the foundation and not towards it. The backfilled dirt that is there around the foundation normally settles at a point lower than surrounding dirt which causes the ground to slope and sink towards the house. You should add some dirt or earth up against the house’s foundation in order to create 2 inch per foot slope against the house’s foundation. Don’t forget to ensure that the top portion of the earth is minimum 6 inches below sill plate. This will help to avoid any ground contact that may cause some building substances to rot in future.
- The gutters and downspouts of the house must be checked. A large quantity of rainwater might accumulate along the edges of the roof. You’ll have problems if this rainwater gets deposited on ground next to the foundation. Keep your gutters clean and also make sure that your downspouts are releasing the water at least five feet away from the foundation.
- Keep shrubs and other small plants away from your foundation. Rotted roots of small plants can create a way for the surface water to drip down to the foundation. The plantings should be kept at least at a distance of 12 inches from the foundation, in a slightly slanted way such that water is directed away from the foundation.
- Waterproof the walls using products such as Xypex and Drylok if there are small, intermittent leaks.
- Repair the defects in concrete walls like cracks or misplaced form tie rods and pipes. Cracks are a potential gate for the outside water to come in. Cracks which do not experience any kind of structural or thermal movement can be treated with Drylok Fast Plug. The Drylok Fast Plug is an effective way of sealing masonry cracks. Another way of treating wall cracks is by using construction-grade epoxy that thoroughly mends wall cracks.
- Install a sump pump in your basement. A sump pump helps to draw the water out from the house and discharge it outside at a considerable distance. You can install the pump yourself, which will require a moderate amount of skill and expertise, or you can call a professional to aid you in this area.
- Install a French drain, also known as a perimeter drain for handling serious water issues. It comprises of a continuous piping system that runs beneath the basement floor and along the basement’s perimeter. The installation process for a French drain is very similar to that of a sump pump. However, it requires removal of a nearly 12 inch wide strip of the basement floor along the perimeter of basement, then filling a 12 inch deep trench with coarse gravel around the drain pipe and then building the concrete floor again.
- Get someone to inject Hydroclay around the foundation. Hydroclay is a version of Bentonite Clay that has the ability to absorb huge quantities of water. It is also used to waterproof manholes, tunnels, backyard ponds, dumps and elevator pits.
Precautionary Measures
You should follow these following precautionary measures while you are attempting to waterproof your basement walls.
- Use eye protection and a respirator or mask while cutting concrete.
- Mold can cause serious health issues. Keep your basement dry by using a dehumidifier.
Although waterproofing your basement might require some time, skill and money on your part, it is worth the effort as this can save your basement from unnecessary leaks and foul smell. You can do it yourself or get some professional help to waterproof all your basement walls.


Superb!!A complete tutorial, nothing could be better than this one. Really helpful with detailed explanation. God bless.
Waterproofing is far more protective. It is very important to understand its cause and more important how to get rid of it.
Waterproofing system is protecting our home. I think installing a basement waterproofing system inside of our home is great idea. It really works well.