Sand Filter Top Mount Multi-port Removal & Replacement Guide
If you are having troubles with your top mount multi-port on your swimming pool filter system and you need to replace the multi-port valve then you can read the steps below to help you do so easily. 
You will need a Philips head screwdriver, Flathead screwdriver, and also a pair of channel lock pliers or a small pipe wrench. You also may want to wear old shoes as your feet may get wet disconnecting all your hoses and plumbing that is connected to your old multi-port.
This Top mount multi-port removal and replacement guide for pool sand filters will walk you through the process. If you own a Hayward Sand Filter, Pentair Sand Filter Or even an old school Pac Fab sand dollar sand filter then you are in the right place.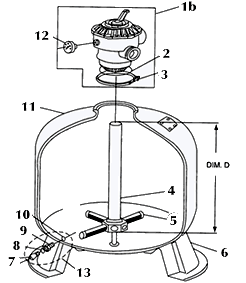
Shutting Down The Filter & Draining Some Water
Before you can get started removing and replacing your top mount multi-port on your sand filter you will first have to shut the pump off and unplug to just to make sure that it doesn’t turn back on while you are working on the filter valve. Then next thing you will want to do, is to remove the drain plug on the bottom of the filter and let about half of the water out of the filter. If this is an above ground pool you are working on, you will first want to skip to the next step and remove the hoses first before draining your filter. ( see below)
Removing The Hoses & Fittings From The Multi-port
Now that you have your filter shut off you can remove the hoses or the hard PVC plumbing from the ports on the multi-port valve. If you have an above ground pool chances are you have flexible hoses that can be removed by loosing the hose clamps on the edges of the hose and then firmly pulling the hoses from the fittings that are screwed into the multi-port. If you have an in-ground swimming pool then you most likely have rigid PVC hooked up or plumbed into the multi-port. If this is the case then you will have to look for the unions and then loosen them. Once the unions are loose you then can spin the fittings and then rigid PVC from the multi-port. If you have any above ground pool you will want to raise the hoses hire then the pool after you disconnect them so you don’t loose any water out of the pool while you are working.
**Pool Guy Trick** When you are disconnecting your above ground pool hoses you can connect one hose from the bottom of the skimmer to the return on the pool. This will create a “water loop” and you will not loose any water while you are working on the filter and pump.
You Now Need To Remove & Loosen The Band Clamp
Once you have removed all the plumbing from the multi-port you can now remove the band clamp that attaches the multi-port to the filters tank. You will either need a large sized Philips screwdriver or you will need a large sized Flathead screwdriver depending on what brand of filter you have. You will want to loosen and remove the bolts on each side of the band clamp and then remove the two parts of the clamp. Some older styles of filters may have a one piece clamp with only one bolt and nut you will have to remove.
ALSO NOTE: You will never want to loosen or tighten a band clamp while the filter is running and pressurized. If you do, you have a chance of the multi-port blowing off while you are working on it. So always be sure to shut the filter system down when tightening or loosening a filters multi-port belly band clamp. The Belly band clamp is located on the very bottom of the multi-port and wraps around an edge on the multi-port and also the filters tank. Some filter manufactures like Hayward will have to bolts on the belly band clamp and others like Pentair and Pac Fab , Sta-rite and others may just have one belly band bolt. So if there is one, remove the one, or of there is two then remove both and then remove the two or one part belly band.
Pull The Top Mount Multi-port Off The Filter Tank
Now that you have the belly band loose and removed the the filter tank you will want to remove the old multi-port. To do so, you will want to twist it and pull up at the same time and it will separate from the filter. Once you have the multi-port removed you will see the sand inside and also the stand pipe. Make sure you do not get any sand down the white pipe that is in the center of the filter. Once again, This is called the filter stand pipe, this is also the pipe that the laterals are attached to on the bottom of the filter.
Prepping Your New Multi-port For Installation
Once you have the old top mount multi-port removed, you will now want to prep up and get your new multi-port ready for installation. You will need to Teflon tape all your fittings that you removed from the old multi-port and then screw them back into the ports on the new multi-port. Once you have all the fittings the new gauge and everything ready on the new multi-port valve you can now get ready to install it, but first you want to make sure of this next step.
Cleaning The Tank Lip Free Of Sand & Debris
Before you install your new multi-port valve you will want to make sure that there is no sand or dirt on the lip on top of the filter tank. If you work sloppy and you leave sand on this lip chances are when you start the filter system back up you will have a leak. Always be sure to clean the top lip of the sand filter tank with a clean cloth to remove all sand and other debris.
Attaching The New Top Mount Multi-port & Clamping The Band Down
Now you can take your new multi-port and place it on top of the filter tank. There are two things that you will want to make sure that you do. The first thing you should do is make sure that the o-ring fits properly into place as you set the new valve down onto the tank. The second thing you want to make sure about is that the standpipe is going into the bottom of the multi-port valve as you place it down. Once you have the new multi-port in place you can out on the belly band and start to tighten in down. Make sure one edge of the band in on the multi-port and then the other side is catching the lip on the filter tank. Make sure not to over tighten the multi-port tank belly band but be sure to make sure it is tight.
Hooking Up The Pool Hoses & The Pool Plumbing
Once the new multi-port is in place you can go ahead and hook up all your hoses & plumbing to the fittings that are on your new multi-port. If you are working on an above ground pool make sure you tighten the hose clamps down good on the end of the hoses. If you are replacing this multi-port on an in-ground pool make sure you connect and tighten down the unions.
Do A “Once Over” Before Starting The Pool Filter System
Your almost ready now to start your filter system back up and get your pool going again, but before you do so, do a “once over” and make sure you have tightened everything down, replaced all drain plugs, cleaned up your tools and of course make sure you have the multi-port set on filter.
Now To Start The System & Check For Leaks
Now that everything is connected, you have done your once over, you can go ahead and start your filter system up and check for leaks. If your multi-port belly band is leaking or dripping a bit, SHUT DOWN the filter and then tighten the band bolt a few turns and then start the filter system up again. If one of your hoses is leaking tighten the hose clamps. If one of your fittings is leaking you may want to tighten it a bit more. Always shut down the filter before working on it.
How To Properly Take Care Of Your New Multi-port.
Here are some things that you will want to remember so you can get the most out of your new multi-port valve.
1) Never move the multi-port valve handle while the filter is running.
2) Always backwash when your filter pressure rises 5 – 10 PSI above normal.
3) During the off season or winter season, winterize the multi-port by removing the backwash sight glass, the gauge, the drain plug and also covering the multi-port for the winter so ice and snow do not freeze and crack the valve.

Am having a problem that when the multi port is on filter it will start to throw water through the backwash hose. It returns the water back to the pool but a little portion of it. Please if you have the answer to this question mail me I really need to know cause my pool is getting green. Thanxs
Hi Osman,
That means that the “spider gasket” inside of the multi=port is going bad and need to be replaced.
Please let me know if you need any other help,
Joseph
I have a similar problem except Im having trouble with water running out of the top of the Multi Port valve instead of out of the backwash hose when its set to filter. Do i need to replace the multi port valve or just replace the spider gasket? Thanks for your time, Josh
I don’t have THE diagram of the top of my sand filter how can I get one ?