How To Rebuild Ao Smith Hayward Motor
If you have a Hayward Super Pump or a Super Pump II and also have an A.O smith electric motor that is powering that pump, then this guide will explain to you how to rebuild your electric pool pump motor. You will need a motor bearing puller, a Flathead screw driver, a nut driver set and about two hours of your time. Having access to an arbor press would also be helpful so you can press your new motor bearings onto the motor armature after you remove the old, worn or noisy 6203 / 6204 bearings from the motor’s armature shaft.
Removing The Wet End / Pump Housing From The Motor
The first thing you will want to do is to remove the wet end,this is also known as the volute or pump housing. You will want to remove this from the motor. You can do this by removing the four flange bolts that connect the wet end of the pump to the motor. Once you remove those four bolts you will be able to remove the wet end of the pump. You will now see the Hayward Super Pump’s diffuser and impeller. You will want to remove both of them and then remove the seal housing. Once you have removed the wet end of the pump, the diffuser, the impeller and the mechanical seal housing you will be ready to actually work on the electric motor.
Remove The Rear Cover Loosen The Motor Through Bolts
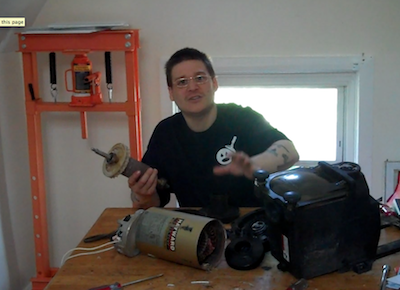
Now that you have removed the pump housing, you will want to remove the motor through bolts. These bolts are what holds the two ends of the motor in place. These motor thought bolts are sometimes hard to remove, so the trick is to work them back and fourth, ( loosen and tighten ) a few times until you can work them all the way out of the pump motor.
To access the motor through bolts on you A.O. Smith motor that was connected to your Hayward pump you will first need to remove the rear motor access cover. You can remove that cover by removing the hold down bolt which is a 1/4 nut driver or a 5/16 if you have an older model. Once you remove the rear cover you will see four hex head bolts that you will have to remove with your nut driver these are the motor through bolts, You will want to remove all four of them. If they are stuck or hard to get out, just make sure to spend some time and slowly work them out of the motor. If you break the through bolts you will have to drill the motor end bells out.
Remove The Front End Bell & Armature
Once the through bolts have been removed you can take a rubber mallet or hammer and knock the front end bell from the motor windings casing. You will then pull on the motor shaft a bit and then the motor armature will come sliding out from the motor windings. Now that you have the motor armature removed from the windings you next step will to be to remove and replace the ball bearings. The Hayward Super Pump uses ( 2 ) 6203 motor bearings on most models and on some motors they use a 6204 on the front of the shaft, but that usually is in the Hayward Super Pump II models.
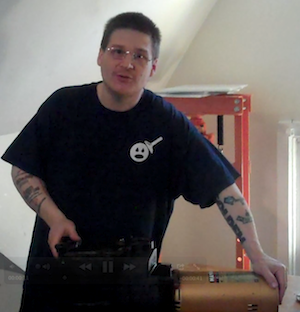
You will need a electric motor bearing puller for the next step in order to remove the bearings. You can buy an electric motor bearing puller at most tool stores like Sears, Home Depot and so on. The motor bearing puller will remove the rear and front bearings from the motor shaft.
Remove & Replace The 6203 Motor Bearings
The first thing you will want to do is take your bearing puller and remove the front and rear 6203 motor bearing from the pump armature. Once you remove the old bearings you will want to press on two new 6203 motor bearings using a arbor press. You will want to make sure that you press the bearings on by the inner race of the bearing only. Failure to press the bearing on by the inner race of the bearing could result in a bearing that does not last for a long period of time and may become noisy right away. Do not press the bearings on by the out part of the race for any means, this will destroy the bearing.
As a side note, some front motor bearings will have a retaining clip that you will have to remove with a pair of ring pliers.
Re-Assemble The Motor & Bench Test
Now that you have replaced the 6203 motor bearings inside of your pump motor you are going to want to put it all back together again. Start by carefully inserting the motor armature into the motor windings casing. Once you do so you will want to install the front motor end bell and then slide all the through bolts into the motor casing. Now you can tighten up all the motor through bolts and then install the wet end of the pump.

Thanks for the informative article. I will be using it on my Pool Pump later. Thanks again.
Hi, all is going nicely here and ofcourse every one is sharing data,
that’s truly good, keep up writing.
Thanks for finally writing about > How To Rebuild Ao Smith Hayward
Motor | Wet Head Media < Liked it!
Hey, I think your website might be having browser compatibility
issues. When I look at your blog in Safari, it looks fine but
when opening in Internet Explorer, it has some overlapping.
I just wanted to give you a quick heads up! Other then that, superb blog!
Hello, I want to subscribe for this web site to obtain hottest updates,
so where can i do it please help.
Hi there, every time i used to check website posts here
early in the morning, for the reason that i enjoy
to learn more and more.
Hi there, this weekend is nice designed for me, for
the reason that this point in time i am reading this wonderful educational paragraph here at my home.
magnificent put up, very informative. I wonder why the other experts
of this sector do not realize this. You must proceed your writing.
I am sure, you’ve a great readers’ base already!
If some one wants expert view regarding blogging then i advise him/her to pay a visit this website, Keep up the nice job.
I like reading a post that will make people think. Also,
many thanks for allowing me to comment!
I do not even know how I stopped up right here, but I assumed this
post was great. I do not realize who you’re but definitely
you’re going to a well-known blogger if you happen to aren’t already.
Cheers!
I think that is one of the such a lot significant info for me.
And i’m glad studying your article. However should statement on few common things,
The site style is ideal, the articles is in reality great : D.
Just right job, cheers
What’s up colleagues, nice post and nice urging commented here,
I am really enjoying by these.
Very good blog! Do you have any hints for aspiring writers?
I’m hoping to start my own website soon but I’m a little lost on everything.
Would you suggest starting with a free platform like WordPress or go for a paid option? There
are so many options out there that I’m totally overwhelmed ..
Any suggestions? Cheers!
Good information. Lucky me I came across
your site by chance (stumbleupon). I’ve saved as a favorite for later!