How to install a ceiling fan
Ceiling fans are a great way to bring style and comfort. They can efficiently control the room temperature and are easy to maintain in low energy costs. These fans can also create a warm, cozy atmosphere during the cold winter months by spinning in the reverse direction. Although for some people installing a ceiling fan may seem to be an intimidating task, it is actually a very easy process and with the right kind of instructions and proper tools one can do it in very little time.
Follow the installing instructions ditto as given on the manual inside the ceiling-fan box.
What size of ceiling fan do you require?
While buying a ceiling fan, you should keep in mind the size of the room where you want it installed. For a room with a dimension of 12 feet or less, buy a ceiling fan of 36-inch diameter. You can buy a 52-inch diameter ceiling fan if your room is at least 15 to 18 feet.
Tools and materials required while installing a ceiling fan
The various tools and materials that are required while installing a ceiling fan are listed below:
- Ceiling Fan Kit
- Ceiling Fan Outlet Box
- Wires
- Wire Cutters
- Wire Connectors
- Light Bulbs (if the fan has lights)
- Electrical Tape
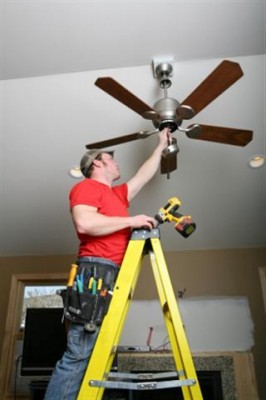
- Stepladder
- Pliers
- Slotted Screwdrivers
- Electrical Tester
- Adjustable Wrench
- Dust Mask
- Goggles
- Downrod (optional)
- Ceiling Medallion (optional)
- Expandable Cross Brace (optional)
Wiring Instructions to Install the Ceiling Fan
Since ceiling fans normally replace pre-existing lights, the wiring should be completed already. If not, you need to check the wiring and see if there are any faults or if the wiring needs to be completed. You can also consult a professional electrician for this purpose.
How to mount the Ceiling Fan
- The fan blades should be mounted at a minimum height of seven or eight feet above the ground. You should also remove any obstructions within 2 feet of the fan blade tips.
- The procedure will get easier if an outlet box is already there in the ceiling. If that box is too old then replace it with a new one that is appropriate for holding the weight of ceiling fans. You should use the installation hardware that is recommended by the outlet box manufacturer. If the fan weighs above 35 pounds, it requires some additional support other than the outlet box.
- The new outlet box should be secured to a support between the ceiling joists. Provide some additional supports between the ceiling joists if there is no 2×4 inches wood bracket.
- You can also install an extendable metallic ceiling fan hanger bar. This can be positioned either from the ceiling surface or from the attic floor. The box can be secured to the installed support with a U-bolt.
Installing the Mounting Bracket for the Ceiling Fan
- Remove all screws from the motor of the fan. You will need the screws later while putting the blade arms together to the motor.
- Detach the mounting bracket from the ceiling fan canopy.
- Attach the mounting bracket to the electrical box using the lock washers and mounting screws. If your fan has a J-hook, install the fan mounting bracket using that. The hook can support the fan motor and make it easy to install the wires.
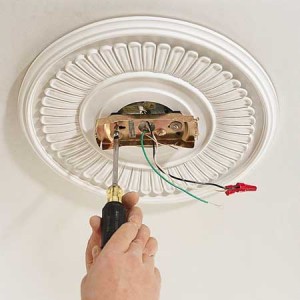
- Insert the electrical wires through the hole at the centre of the mounting bracket.
- Fans having a three-position mount can be installed by that itself or a downrod as well.
Downrod Installation for the Ceiling Fan
- The downrod has to be installed into the mount keeping the ball end pointed towards the ceiling.
- The white, black and blue wires from the motor have to be threaded through the canopy and the downrod. Care should be taken so as not to pull on the wires or tear them apart.
- After inserting the downrod into the collar yoke, rotate the apparatus until it fits properly into the holes. Now insert the connector pin and secure the system with a cotter pin. While doing this, care should be taken so as not to damage the fan wires. Bend the two ends of the cotter pin so that the connector pin does not come out.
- The hanger and the downrod should be attached to the motor assembly by fastening the setscrew. Some ceiling fans may have two setscrews, while in some other cases the setscrews are replaced by lock nuts.
- Now attach the ball with the hanger support and make the necessary wire connections.
- After you have made all the necessary connections and tucked the wires into the outlet box, ensure that the tab at the bottom of the hanger bracket is positioned in the hanger-ball groove. Now position the canopy above the bracket and permanently fasten it with the screws.
Installation of Close-Mount Ceiling Fan
- Firstly, the lock washers and larger screws should be removed from the top of the fan motor housing.
- Now use the same screws to attach the fan-canopy to the housing.
- If there is a J-hook, use it to hang the fan.
- After that make the necessary wire connections and tuck the wires inside the outlet box. Put the canopy on the mounting plate from the J-hook.
- Use the screws to attach the canopy to the mounting plate permanently.
Determining the wire connections for Ceiling Fan
Keep in mind the following wire associations:
Black: The ceiling fan
Blue: The light kit
White: Common for both the fan and the light kit.
Green: The ground
Remember to secure all exposed wiring inside wire connectors. Push the wires gently into the box after all wiring is complete.
Attaching the fan blades
Mount the blade brackets to the fan blades by using the washers and screws and tighten them. Make sure that all the screws are fastened properly.
Attaching a light kit to the Ceiling Fan
If your fan also has a light kit, you may only need to install the globes and bulbs as the wiring may be already in place. However, in some cases you may need to complete the wiring yourself. Here are some instructions on how to add a light kit to your ceiling fan.
- Detach the switch-housing cover plate from your ceiling fan and the plug from the cover plate.
- Insert the black and white wires through the cover plate holes and attach the plate firmly to the light kit so that it does not get loose and vibrate.
- Locate the white and blue wires within the switch-housing and use wire connectors to connect them with the light kit wires. The white wire should be connected to the other white wire and the blue wire should be connected to the black wire. Secure the wire connections using electrical tapes.
- Now gently insert the wires into the switch-housing and use the screws to attach the switch-housing to the light kit.
Maintaining your Ceiling Fans
Here are some instructions on how to take proper care of the ceiling fan once it had been installed.
- While cleaning your ceiling fans, never use a water-soaked cloth as it may induce electrical shock or even warp the blades.
- Try using an anti-static agent instead.
- Always remember to keep the fan switched off while cleaning.
- You can occasionally apply furniture polish to enhance the longevity of the wood protection.
Ceiling fans are an excellent cost effective way to add beauty and comfort to the place. They not only enhance the look of your room but also make sure that you feel comfortable and relaxed.

Make the list, take pictures and drive down to your Building and Safety ofcfie. That unit has multiple minimum living standard violations. A landlord must keep his rental in minimum living standards. If a unit fails to meet these standards then the tenant can remain in the residence with a partial or full (based on # of violations) credit towards their rent while the landlord brings the unit back to code.You didn’t mention your location but I can guarantee heating is on top of the minimum livings standards. You have the law on your side. You can also get the rent you’ve paid back for the time you can prove the problems existed. If I were you I’d save up while the landlord brings the unit to code. File a small claims case for substanard living conditions and use that money to move. For your kids. Asthma and mold is a bad combo. You can do it! WEREN’T GONNA TAKE IT! NO!!!! WEREN’T GONNA TAKE IT ANYMORE
Superb, what a website it is! This webpage presents useful information to us, keep it up.
WOW just what I was searching for. Came here by searching
for layarkaca21 indoxxi
Hello everybody, here every one is sharing these familiarity, thus it’s
pleasant to read this web site, and I used to pay a visit this weblog daily.