Building a shower pan is one of the most significant steps in making a rock solid water tight shower. Often house owners enquire or ask the home decorators as to how to build a custom shower pan. For people residing in hilly areas, their primary enquiry is how to build a shower pan on a wood floor. Building a shower pan may be an easy task for professionals but if not done properly adhering to each and every detail, it can cause frequent leaks and accumulation of water. Basically a shower pan is a type of mortar bed which inclines into drains. It may sound easy but it includes minute details which are important to comply with. If an individual wishes to build a shower pan, he/she should take care of the basic steps which are mandatory to follow.
Such steps include:

- The first and foremost step is to select a multi-layered design to build the shower pan. A water resistant membrane and mortar bed should be used.
- Begin the procedure with the particular drain. In a shower, drain is the most vital aspect since it is the only outlet for water. If in any case, the drain gets blocked, water will accumulate on the floor and will automatically fill the shower. Hence a clamping ring drain is required to avoid such conditions. The upper half is like any other normal drain while the lower half is more or less a backup drainage. The supporting flange of the drain should be put on the plywood subfloor in a straight line. It should be preserved in a proper place along with the mortar installed.
- Make an inclined floor with the help of a latex-altered paint, thin mortar bed. Home interior designers recommend inclined slopes of ¼ inch for every foot. After the exact slope has been determined, a 3/4×3/4-inch float floor covering should be fixed firmly near the shower floor perimeter. It acts as a guideline for setting up a mortar bed.
- At the subfloor, fix a clamp ring drain and fasten a ¾ inch float strips near the edge of the shower floor area. The plywood subfloor should be covered when the float strips are fastened. The plywood subfloor has a layer of 15lb roofing along with a sheath of galvanized extended wire plank, which is held horizontal with the help of clips.
- Dig out the latex- customized mortar. In order to give proper shape to the incline, it is mandatory to ride over the floor coverings and drain flange with the help of wood float. Then the mortar is condensed by compressing it with float. The deck mud cross section is very thin. It is 3/8 thin near the drain area. It should be kept in mind that a strong improving latex additive should be used instead of water for themortar. Then the inclined mortar bed is solidified before the shower pan membrane and is set made to work.
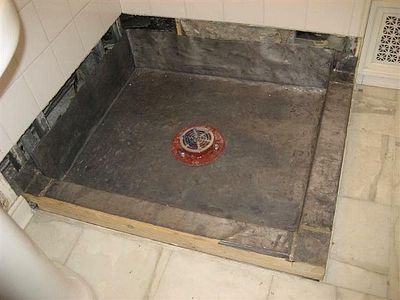
- Then the shower pan liner is installed. The shower pans must be mobile in nature. For the shower pan liners, CPE- chlorinated polyethylene, is generally recommended. It is responsible for making different size of shower pans. The studs near the perimeter of the pan area should be blocked. The blocking should expand to minimum 1inch over the inverted sides of the pan. You must make sure that the fasteners should be flush or countersunk. The sides should be at least 8-9inches tall. Open out the membrane and slice it in the right shape, fold the membrane, unscrew the membrane clamping bolts in the lower part of the drain and use a drop of rubber sealant near the inferior part of the drain and move a drop of rubber sealant near the low drain flange. Then place the membrane on top of the shower floor and minimize it into place. Then fix the excess corner material in the wall blocking after necessary creasing and folding. This should be done keeping all the staples within the boundary of the top edge. Use sealant in the layers of the corners folds to uphold the matter firm against the wall blocking.
- Then set up manufactured dam corners. Set up the prefabricated dam corners which is provided by the membrane manufacturers, exactly where the inverted membrane assembles with the shower curb. Use two 1/8 inch beads of sealants in the pan membrane. After that, run a trowel to couch the dam corners, into the sealant. Then put all the fasteners in the apex inch of the inverted edges. The membrane should be in position and the bolt heads nearby parts which are bulging out, should be cut and the membrane should be pressed over all the four bolts. Then the bolts should be stiffened and a hole should be made in the membrane to open the side of the pan right into the drain.
- Then the shower pan should be examined. With the help of an expanded type stopper, plug the drain and then put water in the pan on the apex of the curb. Then use the water to bed in the mortar floor.
- The mortar floor should be floated. Cord the flexible drain screen right in the structure of the clamping ring before the mortar bed is installed and installing it at the top height of the tile floor. Then put a free draining material such as pea gravel around the bottom of the drain to restrain the deck mud from securing the weep holes. The exact half of the deck mud should be float approximately and should be placed in a strengthening wire and then it should be covered with the mud left. For this purpose, 13/13-gauge 3×3-inch mesh, 16/16-gauge 2×2-inch mesh or a 16/13-gauge 11/2×2-inch mesh can be used effectively. Then the bed should be floated in the final slope. The mortar bed’s finished height should have the position of the floor tile exactly 1/16 to 1/8 inch over the drain along with 1/8 to ¼ inch right beneath the edge of the wall tile. The front edge of the wood float should be slashed since it moves with the bottom edge of the wall tile which is installed much prior to the shower plan construction.
How to build a shower pan for tile
If you wish to decorate your bathroom with all the modern utensils, you may often enquire as to how to build a tile shower pan properly. When you initiate building the shower pan, make sure the tile is water resistant or else leakage will follow eventually. Following are the steps to build a shower pan for tile effectively and easily.
- In order to prevent the floor from retaining water, put plastic on it. If plastic is not placed on time, the concrete can become dry very easily. Plastic protects the wood from getting affected by water.
- On the subordinate parts of the wall or on the threshold, fix a concrete bakerboard. Analyze the gap from the axis to the edge of the drain. ¼ inch scale should be used for every foot in order to determine the tallness of the slope.
- Use a dry mixture of Portland cement and sand in the ratio of 1:3. Use the mixture to build a 2-inch wide mortar near the edge right up to the mark. Encircle the drain opening with loose concrete and level it with adequate pressure. The mortar left, should be filled in and screed smoothly by a board.
- After 24 hours, when you are enabled to walk on the mortar bed, waterproof it. Use 5-inch tiles of Schluter-KERDI membrane.
- Lock it from inside along with performed corners and backerboard.
- Apply fabric to the walls, until the shower area has covering. It should be done when the cardboard is down. Let it dry overnight, before it is put to test for water.
- The next and final step is to use a thin set on the membrane and install the tiling. Do not waste time and install it carefully.
How to build a shower pan on a concrete floor
Homeowners often ask as to how to build a concrete shower pan that will last for years. In order to build a good shower pan on a concrete floor the first and foremost step is to measure the slope. Measuring should be done properly from the drain to all the edges on four sides. The second step is to lay the mortar. The mortar should be a mixture of Portland cement and sand. The mixture should contain 3 parts of cement and 1 part of sand. After using the mortar, the membrane should be installed. The membrane acts as an added protection for the concrete and prevents it from abrasion. Then the drain flange should be sealed and attached with the backerboard. Finally, a concrete layer should be put on top of it and allow it to dry.
Following the above methods will help you to build a shower pan effectively and get the most out of it. By building a shower pan you can enjoy your bath and take the décor of your bathroom to the next level.