Hayward Perflex D.E Filter Repair & Troubleshooting
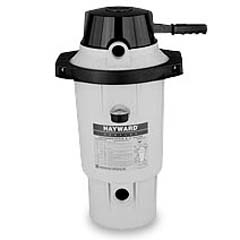
Hayward Swimming Pool Products makes a D.E. pool filter called the Perflex EC-Series Swimming Pool Filter. They make a few different sizes of this Perflex pool filter. The different names of the EC filters are the EC-30, The EC-40, The EC-50 and The EC-65, which is the largest model of the EC-SERIES line.
You will find the Perflex EC-30/40 on many above ground swimming pools. You will find the larger models of the Perflex(EC-50/65), on many in-ground swimming pools. You will also find some EC-50/65 Perflex models can also be used on large above ground swimming pools. The Hayward Perflex EC40 swimming pool filter and other models of this Hayward pool filter have been installed into many backyards over the last 25 years and many will soon need repair or currently do. There are three different models of this filter but rebuilding and troubleshooting them is all basically the same as they all use commonly designed parts.
Many of the things that break on these types of swimming pool filters are actually caused by overuse or neglected repair to the pool filter. Some parts will just have to be replaced because of old age or just normal weathering. Hayward makes many replacement parts for the EC Perflex filter line so there is no need to worry about finding or buying replacement parts. You will only need a few common tools to be able to take apart and fully rebuild or repair your EC30, EC40, EC50 or EC65 swimming pool filter. You will need a basic standard socket set, a flathead screw driver, an open-end crescent wrench and a garden hose to wash the filter. You will also need some Teflon sealant tape to wrap around a few fittings and threads. If you have any broken fittings in your filter, you then will also need a small hammer.
If you know what part is already broken on your filter then you can just use this guide to repair the problem with your Perflex pool filter. If you have no idea what is wrong with the filter you can use the Hayward Perflex troubleshooting guide on the bottom of this page to help you figure out what parts you need to change. You will also always want to clean all the parts pf the swimming pool filter as you are working with them. There is no reason to work on a filter that caked up with dirty D.E powder. Always work safe and clean when working on your pool filter.
Most Common Hayward Perflex Pool Filter Problems w/Solutions:
Below you will find many common problems with easy to read DIY Pool Repair guides for the Hayward Perflex EC-Series filter. Most of these repairs can be done by the average person with a small set of tools. If you feel you can not do the repairs yourself for any reason, you can always call a swimming pool service professional to repair the problem for you. You can also bring your filter to many swimming pool repair centers to have them fix it for you.
How To Replace A Broken Hayward EC Pool Filter Gauge:
If your filter gauge on your filter is broken or cracked then you will need to replace it with a new one. Replacing the gauge on the EC40 or another EC Perflex filter requires just a few steps.
The first thing you will want to do is to buy a new replacement gauge for the Hayward EC filter that you are working on. Once you have the new gauge you can remove the gauge one of two different ways. The first way is to carefully grab the gauge with your hands and spin the gauge counter clockwise until it’s all the way out. If the gauge is tightened a lot you will have to use the other method to remove the gauge. This method would be to use an open-end wrench or a crescent wrench to remove the gauge from the filter.
Just on top of the gauge threads you will see a square that is made from the brass that the threads are. You can attach your wrench to that square and then turn the gauge counter clockwise to remove it. Once the gauge is removed you will want to install the new EC filter gauge. Before you screw the new gauge into the filter you will want to wrap the filter gauge threads a few times with some Teflon tape so that the gauge doesn’t leak. Once you wrap the Hayward EC swimming pool filter gauge a few times with the tape you can screw it back into the pool filter. Once you have hand tightened the filter gauge back into the filter you can use your wrench that you removed the gauge with to tighten the gauge all the way. Be sure to be careful as the gauge stem is made from brass and the filter is made from plastic. If you over tighten the gauge you cab crack the filter housing.
How To Repair The Hayward EC-Series Pool Filter Bump Handle:
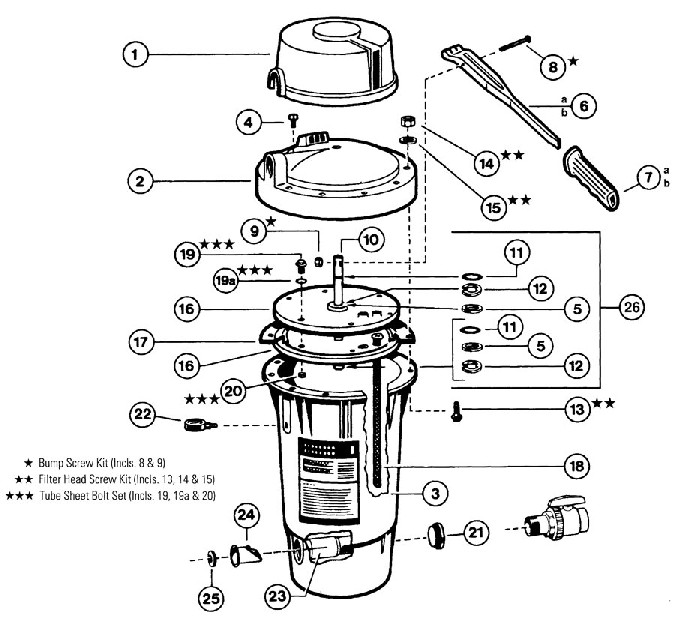
What makes the Hayward EC-series filter so unique is the way it works with the “bump handle” or D.E. media regeneration handle. This handle is used to regenerate the D.E. filter media as well as to shake off all of the D.E. from the fingers when its time to backwash. Sometimes this bump handle will break off from old age or when someone forces the handle down too fast when using it. When this happens you will need to replace the EC series bump handle with a new one.
In order to replace the bump handle on the Hayward EC65 or other sizes is to first remove the bump handle grip. This is the grip that is at the end of the handle itself. If you have a yellow tank EC filter you will just pull off the grip, as it is probably a runner one. If you have a new Hayward EC pool filter you will have a black hard plastic grip that will have a push tab at the end of it that you will have to push over. Once you push over the tab you will pull the grip off of the bump handle and then you can slide it on to your replacement Hayward EC filter bump handle.
Now that you have replaced the grip on the handle you will want to remove the cracked or broken handle from your Hayward Swimming Pool Filter. To do so you will have to remove to nuts and bolts that go through this handle. One bolt will go through the plastic top of the filter and this bolt is found at the end of the handle. The other bolt will go through the bump handle and the tube sheet bump shaft; this bolt will be at the center of the handle. You can remove both bolts with a Flathead screw driver and an open-end crescent wrench.
Once you have removed the two bolts you can remove the handle from the top of the Hayward Perflex Pool Filter tank. Now you will want to replace the handle with the new bump handle. To do so align the holes on the bump handle with the holes at on the filter tank and then push the bolt through. Once the bolt is through tighten down the nut clockwise a few turns. Once you have the first bolt in you will want to insert the second bolt through the bump handle and then through the bump shaft. Once the bolt is through you can fully tighten down both bolts and your new handle install will be complete.
How To Replace Cracked Tube Sheets:
If you look inside of the EC-series line of swimming pool filters from Hayward is something called “Tube Sheets” and something else called “filter fingers”. The tube sheets are pieces of round plastic that have many holes inside of them to hold the filter fingers. There are two different tube sheets inside of the filter. There is a top tube sheet and a bottom tube sheet. Often these tube sheets crack from pushing on the bump handle to hard. When the tube sheets crack they will allow D.E. powder back into the pool when running.
To replace the tube sheets you will have to remove all of the bolts hold the top of the EC tank lid to the body of the filter. In older models you will find lots of bolts that hold on he top and in new EC-40, 50 and 65 models you will find a single bolt that is connected to collar that holds the filter together. Once you remove the top of the filter you will be able to take off the top and see the fingers and tube sheets.
Now that you have the top off you will want to remove the center bolt from the bump handle that is connected through the stainless bump shaft that also goes through the tube sheets. Once you remove this though bolt you can pull the tube sheets and fingers from the filter top. You will now want to start removing all the small 5/16 bolts around the edges of the tube sheets and once you do the top tube sheet will separate from the bottom.
Once you do this you will have to remove two c-clips. One from the bottom of the tube sheet and one from t he top. It is easier to do the one on the top first and then you can slide the shaft through the tube sheets and remove the other one. It is always best to replace the c-clips in the perflex when you are changing the tube sheets.
When you remove the top tube sheet you will also have to be careful that you do not loose or damage the rubber tube sheet tank gasket. You will have to re-use this gasket when you put the filter back together unless you bought a new one when you bought the tube sheets. If you have not started yet or have not put the filter back together yet you can also ways got out and buy a tube sheet tank gasket.
Once you have removed the top tube sheet you can start to pull all of the fingers out of the lower tube sheet and put them into the new tube sheet. You will want to clean the fingers first also before putting them into the new tube sheet. Once you have removed all of the fingers from the cracked lower tube sheet you can now line up the holes in the rubber tube sheet gasket with the lower tube sheet and then re-bolt on the
Now that the fingers are in the new lower tube sheet and the tube sheets are bolted back together you can stick the bump shaft back through the top of the filter. Once the bump shaft is through the top of the filter you can re-insert the long bolt that goes through the bump handle that you removed when disassembling the filter.
If you now have the filter all together you can line up your discharge fitting with your pool hoses or pipes and re-bolt down the top of the filter to the tank. If you have an old Hayward EC series filter with multiple bolts in the top you will want to make sure to tighten them down evenly to prevent leaks.
How To Repair Hayward Perflex Leaking Bump Shaft Seal:
On the bump shaft on the Hayward Perflex you will see two different o-rings. These o-rings are made from rubber and stop the water from leaking through the bump shaft, From time to time these o-rings will have to be replaced. If you see water leaking from your bump shaft on your Perflex filter then you will need to replace your o-rings.
To replace the o-rings you will need to disconnect the pump handle and remove the bolts of the bellyband from the filter tank top. Once you have done so you will be able to remove the inner filter assembly out from the filter top. Now that the bump shaft is exposed you can remove the o-rings if they are still on the shaft. Sometimes the o-rings get so old they just fall off and go out the backwash line. If this is the case you will not have to worry about removing them.
Once the old o-rings are removed from the bump shaft you will want to grease up the shaft with some lubricant and then slide the new or-rings onto the shaft and into the grooves. There will be an upper and a lower groove in the shaft for the o-rings to sit into. Once they are sitting into place correctly you will want to grease them again and then slide the bump shaft back through the top of the filter and then reattach the bump handle to the shaft.
Now that the filter assembly is reconnected to the top of the filter tank you can bolt the top of the filter tank on to the bottom of the filter tank using your bolts or bellyband. Depending on how old your Hayward EC filter is will determine if you have a bellyband or a bolt pattern. The older Yellow Perflex tanks had a bolt pattern with many bolts. The newer Gray Perflex tanks now have a bellyband with just one bolt you will have to remove or tighten.
How To Replace A Leaking, Stuck Or Broken Backwash Valve:
The standard backwash valve on the Hayward Perflex is actually made by Hayward and can be replaced easily with a few minutes of your time and of course a new replacement Hayward Perflex Backwash valve is required. Before you can change the valve you will want to backwash your swimming pool filter and then drain it by leaving the backwash valve open until all of the water comes out. If you are working on an above ground swimming pool you will need to plug the swimming pool returns and skimmer or shut the filter isolation valves so that the pool water does not keep filling the filter.
Once the pool filter is back washed and drained you can remove the backwash valve by turning it counter clockwise. If you have a backwash line attached to the backwash valve you will want to remove that first. This may also require you to move the backwash fitting from the old valve. It will take 5 – 8 complete 360-degree spins or so before the valve becomes free. Once the valve is removed you will have to replace it with your new Hayward Perflex Backwash Valve.
You will now want to wrap the backwash valves threads with a few wraps of Teflon Tape before installing the valve. Once you have applied the Teflon tape you can tighten the new backwash line into place. If you had a backwash hose hooked up to the old valve you can now hook your backwash line on to your new backwash valve.
Now that the new backwash valve is installed you will want to put the valve in the off position and remove the plugs from the filter and the return jets if you were working on an above ground pool. You can now start your filter back up and re-add your D.E. powder. If you see any small drips or leaks from the new valve, shut off the filter and tighten the valve a bit more.
Hayward Perflex EC-Series Pool Filter Troubleshooting:
Problem: “My Perflex Pool Filter is leaking from the bump shaft”
Solution: You will have to replace the o-rings that are on the bump shaft. They are either worn or missing and this is why the shaft is leaking on your Hayward Perflex Filter.
Problem: “How Do I tell How Old My Perflex Filter Is?”
Solution: Hayward made the tanks on the EC-series Yellow for many years, so if you have a yellow tank you have an older filter. If your tank is gray you have a new Hayward Perflex Pool Filter.
Problem: “My backwash valve is still leaking after I have shut it off”
Solution: You can screw in a plug with an o-ring into the end of the backwash line as a temporary fix until you get a new backwash valve.
Problem: “How Do I bleed the air from my Perflex Filter?”
Solution: You can bleed the air our using the air relief screw on top of the filter.
Problem: “When I push my bump handle up and down it feels like its not working and really loose, what is wrong?”
Solution: When you push the bump handle up and down and it feelslike nothing is working it usually means that one of the c-clips that are connected to the bump shaft has broken and now the shaft can not push the tube sheets up and down. You will need to replace both the upper and lower bump shaft c-clips.

I was wondering when you do the precoat,is it better to take the skimmer basket out or leave it in.I always take it out>>Is that correct or does it not really make a differance.Just curious and by the way, great sight and great input!!
I have a hayward pro series in ground sand filter and I’m having some issues. First ,when I turn lever to recirc, I’m getting water coming out of my waste tube. Second, when I vaccuum to the filter,I’m seeing cloudy water coming back into pool. Third, after I vac.to waste and turn lever back to filter, It takes awhile for the pump to fill up filter and I’m seeing bubbles out of my returns to pool but no jet of water. Any suggestions.
@Jason.
I usually take the skimmer basket out of the skimmer when adding new DE power. The reason for this is because usually the skimmer has leaves and other debris that will stop the flow of DE so I just take the basket out as I said,
Hope that helps.
@Chris
Your multi-port direction valve gasket or the valve itself is bad. You will need to replace the entire multiport or just the multiport gasket if the body of the multiport gasket is still good.
This is because the multiport is bad, so when its on “filter” it’s really not, hence the dirty water coming back into the swimming pool.
Yes, This is a separate issue and is not a filter issue but a pump suction issue,
What is happening is that the pump is sucking air and then pushing the air out of the return jets,
See this article that I wrote called “Your Pump Will Suck Air” it explains why and how to fix most issues.
Here is that article: http://wetheadmedia.com/your-pool-pump-will-suck-air/
Chances are you just have a loose fitting or drain plugs that needs to be Teflon Taped.
Let me know if you have any other questions.
Joseph
What would cause the DE to flow back into the pool by the skimmer when I try to bump the filter. It happens when I open the bleed valve and the strainer basket at the same time.
Hi Jack,
What type of swimming pool do you have and what model of the EC-series do you have,
Please let me know so I can diagnose your problem better,
The filter is a EC65A and the pool is unground.
have a hayward perflex ec40 ok had algae problem cleaned all algae that i could see. used algicied.all kinds of chemicals that pool co says. superchlorinated with 30 bags of shock in 3 days as co says backwashed cleaned the fingers water is still cloudy white and we are bumping like every 15 minutes whats going on
cont. from above pool is 16x24x4 above ground filter is only 1 yr old and runs 24/7 but bumping it every 10-15 minutes is horrible… when we start it it starts at 10 but the flow stops at like 16 and we have to bump it again thens starts great for another 10-15 minutes we have been doing this for 4 days now and have went through 50 pounds of d.e.
when I first started my filter it ran fine. Now the skimmer loses it’s suction and is restored after I backwash but loses suction after a short time. I don’t believe there is a clog due to the fact it runs so well after backwashing. Any suggetions
Hi,
I have an EC40 bought it brand new last year. This is the second one, the first I had to return because it was letting DE back into the pool and I could hear something bouncing around in it. They gave me a new one (supposedly) but I am still getting DE in the pool. I did have a sand filter prior but because we were getting sand in the pool I replaced it. Now low and behold I am still getting stuff (DE) in the pool. What could cause this? We need to vaccumme after every filter run. I can send picture of my hook up if you think that would help? I am at a total loss here, every filter we own is either defective or I am doing something wrong?
Looks like Joseph has a busy bunch of Memorial Day Weekend pool revalers to tend to!
Great site, and thank you for your time and the informative suggestions on these problems with the Hayward Perflex filters. I just installed a rebuilt EC50 this weekend but am missing the pre-pump skimmer basket (on order with Namco). Won’t be vacumming till that comes in! Can’t wait to see how this fairs against the old ProLine sand system I had that crapped out last week. I hear these DE filters are great (when they work right.. LOL )
Troy,
It sounds like you may have cracked tube sheets, You will need to take the filter apart and will have to inspect the tube sheets.
let me know if you need more help!
Hi Bill,
Thank you very much, Let me know if you have any questions.
Thank you Joseph for all the helpful suggestions. I also have a problem with my Hayward Peflex DE filter with the fingers. The pool is still green even after washing the fingers with water, backwashing numerous times and using lots of shock. My pressure goes from 30 to 40 (very low pressure) in about 15 minutes, not 2 hours as other people said. Do you think the acid or vinegar wash will help dramatically?
The filter is about 5 years old. Thank you!