Delta Classic Kitchen Faucet Troubleshooting & Repair
If your Delta Faucet is leaking, dripping or you just simply need to replace a broken part then the good news is that you can do this with some few basic hand plumbing tools. It’s always best to change the leaking stem of any faucet because that will save lots of water. Most of the time your faucet will leak because the faucet stem, faucet washers, or the faucet seat have gone bad. Sometimes the packing on your faucet will start to leak as well.
You can find many replacement parts for your Delta Faucet at plumbing supply houses, local hardware stores with a large plumbing isle or even right online. If your faucet needs many parts you might want to consider replacing the entire faucet to save money. Sometimes its just cheaper to replace the faucet then to replace part by part. When working on your Delta Faucet always be sure to inspect all internal and external parts for wear. If you notice any part of the faucet that is worn you should also repair that part as well. Also always be sure to inspect your faucet water supply lines and valves to make sure they are also in good standing order.
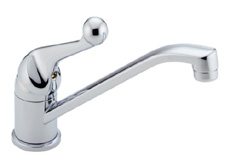
How To Replace The Delta Faucet Stem
The first thing you will want to do when changing the faucet stem is to make sure that the water to the faucet is turned off. You can shut the water to the faucet by shutting off the supply valves or simply shut the main water supply to the kitchen.
Step One: Removing The Faucet Handle
The first thing you will have to do to replace the Delta faucet stem is to remove the faucet handle. If your hot water stem goes bad you should also replace the cold side and if the cold side stem goes bad you should also replace the hot side. This is not necessary but you might as well change the opposite side to ensure that the faucet will not leak from either side. You can remove the faucet handle by removing the Allan key set screw that is in the side of the Delta faucet handle. You can see where the set screw is by looking at the Delta parts diagram on this page.
Step Two: Removing The Stem From The Faucet Body
In order to remove the stem from the faucet body you will have to remove the lock rings that are shown in the diagram below. You can do this by turning the lock rings to the left (counterclockwise) with a pair of channel locks and you will want to keep turning them until the lock rings can be removed. Once you have removed the lock rings you will be able to remove the faucet stem. Then you will want to replace the worn Delta stem with a new replacement Delta faucet stem and re-assemble the faucet stem and handle.
How To Remove The Faucet From The Sink
If you need to remove the entire Delta Faucet from the sink you can with a few steps. The first thing you will want to do is shut the valves off that supply water to the faucet. Next you will want to disconnect the faucet supply lines from both the supply valves and also from the faucet stems. You can remove the basin supply nuts with an open end wrench. You then can remove the nuts on the water supply valves with the same wrench. Once you have disconnected the water supply lines to the faucet you can now remove the faucet basin hold down nuts and then slide out the faucet from the sink.


Usually I do not read post on blogs, but I would like to say that this write-up very compelled me to check out and do it! Your writing taste has been surprised me. Thank you, very nice article.|