How to Solder Copper Pipe
If you want to solder the copper piping in your home, you need to know the basic steps involved in this process. Soldering copper pipes is a relatively easy task and you don’t need a plethora of special skills to do it successfully. This article will walk you through the essential guidelines that you need to know while you attempt to solder copper pipes yourself as well as mention the safety precautions that you should observe in order to protect yourself and your house from possible fire hazards.
Tools and materials required while soldering copper pipes
The basic tools and materials that you need to have for this DIY project are listed below.
- Tube cutter
- Propane torch
- Lead-free Solder
- Striker
- Emery cloth, 120 grit
- Flame protector cloth
- Fitting brush
- Fire extinguisher
- Paste flux
- Gloves
- Protective Eye Goggles
The propane torch consists of a regulator and a tip. While operating, you have to open the fuel adjustment valve and ignite the tip. It is better to use a regulator that comes with a built-in igniter. You have to push the button in order to fire up the gas. On the other hand, if you choose to buy the general regulator, remember to get a striker as well. Using a striker is much safer and simpler compared to matchsticks.
For soldering copper pipes, you have to buy lead free solder as lead can combine with your water supply, resulting in lead poisoning.
The tube cutter that you buy should be able to cut tubes of at least 1 inch diameter. This will work well for most household water pipelines.
You also need to get “paste flux” or “tinning flux.” The flux acid helps in cleaning the copper surface as heat is applied to the joint, thus enabling smooth flow of the solder.
Cutting and smoothening the copper fittings
At first, you will have to cut the copper wires according to your desirable sizes and then prep them for a smooth finish. The following guidelines will show you how to go about the process:
- Copper is a very soft metal that can easily be cut using a tube cutter.
- Use a hacksaw if you have to cut larger tubes.
- File off and remove all the burrs left over from cutting to prevent leaking joints.
- To get a better grip while cutting the copper tube, firmly grip the copper tube in one hand and use your knee to hold on to the other end. This will prevent the copper tube from slipping and you can easily tighten and turn around the tube cutter. Be careful while tightening the cutter as this can bend the pipe.
- While cutting the copper tube, a small ridge bend inward will be produced. This can block the smooth flow of water in the pipeline and thus has to be removed.
- You have to clean and polish the important areas of the tubes and fittings to ensure a leak proof joint. This is a very key feature of successful copper soldering. To do this, first you have to clean all the rough edges and corrosion off the surfaces. After that, coat the mating surfaces with paste flux, an acidic paste which helps in chemically eroding the corrosion away and make the copper surface smooth.
- Use strips of 120-grit emery cloth to clean the copper surface. You can also use sandpaper or steel wool for the same purpose. You will also have to clean the inside of the fittings by using the emery cloth or more conveniently, a fitting brush.
Heating the copper joint
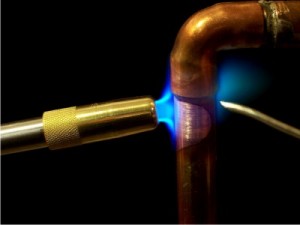
The easiest thing to do is to clean, polish and assemble the total length of the copper piping and solder the joints in proper places all at once. To do this, ignite your torch and regulate the flame in such a way that the blue cone at the center of the flame is at least around 1 1/4 inches in length; the longer is the size of the cone, the hotter the flame. The tip of the blue cone marks the hottest point of the flame.
- Hold the flame in a convenient way such that the tip of the cone touches the fitting. It’s not absolutely necessary to provide direct heat to the tube as the fitting promptly conducts the heat to the copper tube within the joint.
- Once the temperature of the copper joint reach the melting point of the solder, the solder wire will melt and stream into the copper joint. The solder should be held opposite to the flame at the coolest point to ensure that all parts of the copper joint are sufficiently heated. The liquefied solder won’t fill spots having a lower temperature than that of its melting point.
- Fill the joint completely with the molten solder and then do the same with the next joint.
- Give the joint around 45 to 60 seconds to cool down and harden. Put pressure on the joint so that it consolidates. Do not use hands to directly handle the joint as it will still be too hot. Instead, use a metallic instrument to give pressure.
Applying special techniques for difficult areas
It is not possible to solder copper piping with water in it. You have to make sure that the area being soldered is dry and free of water. Applying heat with a burning torch can help to dehydrate the copper tubing. You will also have to enable depressurization so that any pressure formed within the tube during soldering can be removed. The best way to do this is by keeping an open faucet at one end of the tube.
If the copper tubing has a diameter larger than ¾ inches, apply heat to the tube joints from several sides in order to increase the temperature more uniformly. You also need to add solder from different points and make sure that the solder engulfs the joint on all the sides.
If you need to solder brass fittings, you will need more heat. Keep the valve open and allow any additional pressure to escape. This will prevent leakage of the joint. Remove any rubber or soft plastic parts that the valve may have so that they don’t get ruined.
Necessary Safety Precautions
While soldering copper pipes, you should follow the necessary precautions to ensure safety from fire accidents.
- Have a flame protector cloth nearby when you are working with the torch.
- Remove any unnecessary inflammable materials from close vicinity.
- Keep a bucket of water or a fire extinguisher handy to prevent any fire hazards.
Soldering copper pipes is a very simple task, provided you follow the practical guidelines that are discussed above. The procedure takes only 30 to 60 minutes for completion. Doing it yourself is also quite easy on your purses.


Article is very well written and very informative. I will bookmark site for future visits and Refer site to other end users.
Very energetic post, I liked that bit. Will there be a part 2?|
A motivating discussion is definitely worth comment.
I do believe that you should write more
on this subject matter, it may not be a taboo matter but generally people don’t speak about such issues.
To the next! Many thanks!!
I have been exploring for a bit for any high-quality articles or weblog posts
on this sort of area . Exploring in Yahoo I at last stumbled
upon this site. Reading this information So i’m glad to exhibit
that I have a very good uncanny feeling I came upon exactly what I needed.
I most undoubtedly will make sure to don?t
overlook this web site and provides it a glance regularly.
If you desire to take much from this article then you have to apply such strategies to
your won blog.
tres bon post très instructif .